
When it comes to comfort food, few dishes can compete with the warmth and charm of a classic Pierogi Recipe. These delightful dumplings have captured hearts and palates across the globe, serving as a symbol of home-cooked goodness and family traditions. Originating from Eastern Europe, particularly Poland, pierogi offer a versatile canvas for flavors—filled with everything from potatoes and cheese to sweet fruits. As you prepare to explore this culinary treasure, you’ll discover not only how to make them but also the rich stories that each bite can tell.
Creating your own pierogi at home can be a rewarding experience, inviting laughter and joy into the kitchen. Whether you’re crafting savory or sweet variations, the process allows for creativity and adjustment to suit personal tastes. Plus, sharing your homemade pierogi with loved ones fosters a sense of belonging and comfort. So, roll up your sleeves and get ready to dive into the world of this delicious dumpling, as we unveil a Pierogi Recipe that is sure to impress!
Essential Ingredients for Pierogi Recipe:
Creating the perfect pierogi starts with gathering the right ingredients. Below, you’ll find all the necessary components for a delightful potato filling and a soft, chewy dough. Let’s break this down into sections for clarity.
Potato Filling
To achieve that classic flavor in your pierogi, you’ll need:
– 2 lbs russet potatoes (about 5 medium), peeled and cubed
– 1/2 tsp salt
– 2 Tbsp unsalted butter, melted
– 2 oz cream cheese, softened to room temperature
– 3/4 cup mozzarella cheese, shredded
These ingredients combine to create a creamy, delicious filling that pairs perfectly with the dough.
Pierogi Dough
Next, let’s move on to the dough. The following ingredients will yield a fantastic base for your pierogi:
– 1 cup warm water
– 1/4 cup whole milk
– 2 Tbsp sour cream
– 3 Tbsp extra light olive oil or vegetable oil
– 1 large egg
– 1 1/2 tsp fine sea salt (plus more for cooking)
– 4 cups all-purpose flour, measured carefully
Mixing these ingredients skillfully will ensure you get that desired soft texture. Make sure not to overwork the dough, as it might become tough.
Deciding on Toppings
To finish off your dish, consider these optional toppings. For a savory touch, try:
– 4 oz bacon, chopped and sautéed until crispy
– 2 Tbsp unsalted butter
– Sour cream, for serving
The right toppings can elevate your pierogi experience, making it even more delectable. For a twist on dinner that can please a crowd, you might also explore this delicious ground beef orzo recipe, which can serve as a great side dish.
In summary, gathering these essential ingredients for your pierogi recipe not only leads to a comforting meal but also opens the door to personal creativity with filling and toppings. Enjoy the process, and soon you’ll have homemade pierogi to savor!
Step-by-Step Guide on How to Prepare Pierogi Recipe:
Pierogi, a delightful Polish dish, serve as a comforting homemade meal, stuffed with various fillings. In this guide, we’ll focus on a savory potato filling, highlighting its creamy and cheesy goodness.
Prepare the Potato Filling
Start by boiling the peeled russet potatoes in a large pot filled with salted water. Cook them until fork-tender, which should take around 15-20 minutes. Once boiled, drain the potatoes well and return them to the pot.
Add the melted unsalted butter and softened cream cheese. Mash the potatoes thoroughly to combine, ensuring a smooth texture. Then, mix in the shredded mozzarella cheese until it melts into the warm potatoes. Set aside to cool while you prepare your dough.
Making the Pierogi Dough
In a separate bowl, combine warm water, whole milk, sour cream, and olive oil. Whisk these ingredients together until smooth. Then, add the beaten egg and fine sea salt to the mix, ensuring everything blends well.
Gradually incorporate the all-purpose flour. Start with one cup at a time while stirring, until a soft, elastic dough forms. Knead the dough on a floured surface for about 5-7 minutes. If the dough becomes too sticky, sprinkle additional flour as needed.
Filling and Shaping the Pierogi
Divide your dough into four equal portions. Roll out one portion on a floured surface until it’s about 1/8 inch thick. Using a round cutter or glass, cut out circles of dough, roughly 3 inches in diameter. Place a teaspoon of the potato filling in the center of each circle.
Bring the edges together and pinch them closed, ensuring there are no gaps. This step is crucial for keeping the filling inside during cooking. Repeat this process with the remaining dough and filling.
Cooking the Pierogi
Bring a large pot of salted water to a boil. Carefully drop in the filled pierogi, cooking in batches to avoid overcrowding. Allow them to cook for 3-4 minutes after they float to the surface. This indicates they are ready. Using a slotted spoon, remove the pierogi and set them aside.
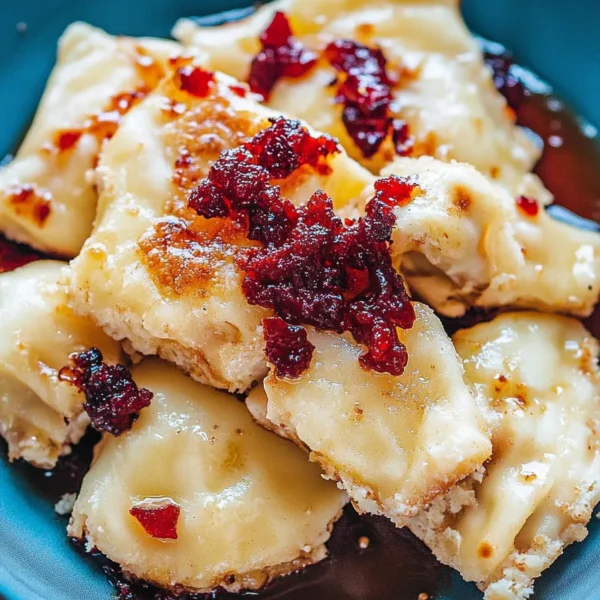
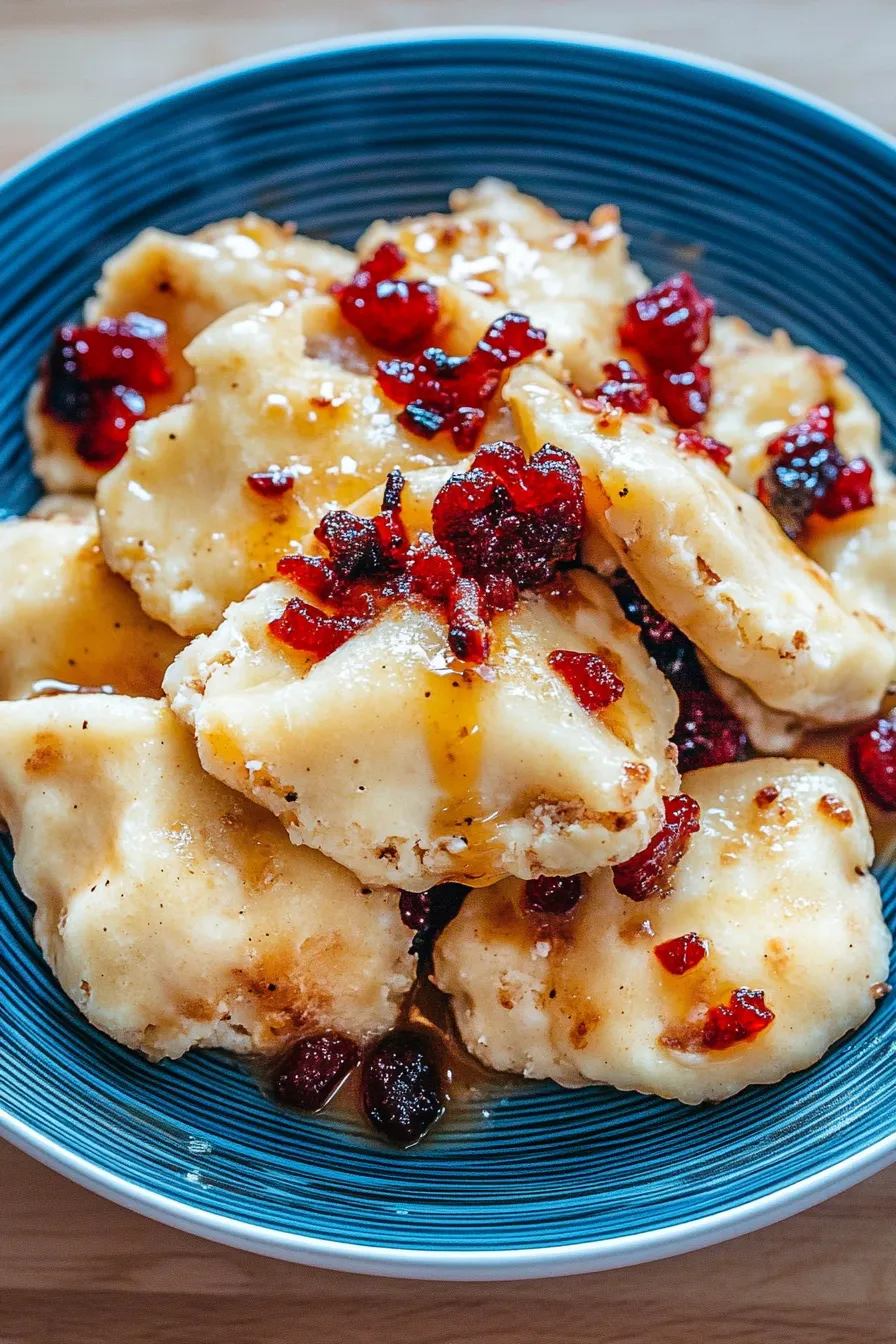
For the finishing touch, sauté chopped bacon in unsalted butter until crispy. Drizzle the mixture over the cooked pierogi before serving. Optionally, add a dollop of sour cream for extra flavor.
Enjoy your homemade pierogi as a heartwarming dish perfect for any gathering!
Tips for Cooking Pierogi Recipe Perfectly:
Cooking a delicious pierogi is an art that combines the right ingredients, techniques, and some helpful tips. Here are essential insights to ensure your pierogi turns out perfect every time.
Get the Dough Right
First, pay attention to your dough. A good pierogi dough is soft and pliable. Start with all-purpose flour, and add water and eggs. Knead it well until it becomes smooth. If it feels sticky, sprinkle in a little more flour. For an even richer flavor, consider using sour cream in your dough. This variation not only enhances taste but also contributes to a softer texture.
Choose Quality Fillings for Your Pierogi
Choosing fresh and high-quality fillings can elevate your pierogi. Traditional fillings may include potatoes, cheese, or sauerkraut. However, don’t shy away from experimenting with options like mushrooms or even bacon for savory bites. For a different twist, consider trying the fabulous creamy balsamic dressing as a delicious dipping sauce to accompany your pierogi.
Perfect Your Cooking Method
When it comes to cooking, boiling is the classic method. Boil water with a pinch of salt, add your pierogi, and cook them until they float, indicating they’re done. For added flavor, sauté boiled pierogi in butter until golden brown. This creates a delightful crunch and enhances the overall taste. If you’re unsure about your technique, for an excellent step-by-step tutorial, check out this detailed pierogi recipe.
Serving Suggestions
Finally, presentation matters! Serve your pierogi with a dollop of sour cream and some fresh herbs to make them look appetizing. You can also garnish with finely chopped onions or crispy bacon for an added crunch. Pair them with a fresh salad, like a three-bean salad, to round off your meal beautifully.
In conclusion, by focusing on quality ingredients, mastering the dough, and applying these cooking techniques, your pierogi will delight your family and friends. With these tips, your pierogi recipe can truly shine!
Storage Tips for Pierogi Recipe:
Pierogi are a delightful and versatile dish that can be enjoyed in various ways. After you prepare your pierogi recipe, proper storage ensures that they remain fresh and ready for enjoyment later. Here are some essential tips for storing your homemade pierogi, plus ideas for reheating them so they taste just as good as when freshly made.
Refrigeration of Pierogi
If you plan to eat your pierogi within a few days, store them in an airtight container in the refrigerator. Be sure to layer parchment paper between each layer of pierogi to prevent them from sticking together. This simple step is crucial as it allows for easy access when you’re ready to enjoy them. Generally, refrigerated pierogi can last up to three days. When you’re ready to eat, simply boil them for a few minutes or sauté them in butter for an irresistible crispy texture.
Freezing Pierogi for Long-Term Storage
For longer storage, freezing is the way to go! First, make sure your pierogi are fully cooled. Spread them out on a baking sheet lined with parchment paper in a single layer. Freeze them for about an hour until they are firm. Once frozen, transfer them into a freezer-safe bag, removing as much air as possible. This method helps prevent freezer burn and keeps your delightful dumplings fresh for up to three months.
When you crave pierogi, you can cook them directly from frozen. Just add extra boiling time or sauté them in butter until heated through. This convenience makes frozen pierogi a fantastic option for busy weeknights.
Additional Serving Ideas
While pierogi are delicious on their own, consider pairing them with various sides. A great accompaniment could be a refreshing three-bean salad that complements the richness of the dish. This contrast enhances your meal, making it hearty and balanced.
In summary, whether you store them in the refrigerator or freeze them for a later date, following these storage tips ensures that your homemade pierogi maintain their taste and texture. Enjoy your culinary creation multiple times, and if you’re looking for more delicious recipes, check out the enticing grilled peach chicken recipe for a flavorful summer treat!
Serving Suggestions for Pierogi Recipe:
When it comes to serving your delightful pierogi recipe, the possibilities are endless. These little dumplings can be enjoyed in various ways, enhancing the overall experience for you and your guests. Below are some creative serving suggestions to elevate your pierogi from ordinary to extraordinary.
Classic Toppings
One of the simplest ways to enjoy pierogi is by adding classic toppings. Sour cream is a favorite, as its creamy texture and tangy taste complement the dumplings beautifully. You can also sprinkle crispy fried onions over the top for added crunch. If you prefer depth of flavor, try sautéed mushrooms which add a delightful earthiness.
Add a Burst of Freshness
For a refreshing twist, consider serving your pierogi with a side of homemade three-bean salad. This dish adds a vibrant touch to your meal, elevating the flavors of the pierogi. Its fresh taste and crunchy texture make it a perfect companion, enhancing the overall dining experience. You can whip up this quick salad with beans, bell peppers, and a zesty dressing that balances the richness of the dumplings.
Side Dishes that Impress
Pair your pierogi with various side dishes to create a complete meal. Roasted vegetables, such as Brussels sprouts or carrots, can provide a nutritious balance to the richness of the pierogi. Grilled meats, like chicken, can be another great option. For example, consider making a flavorful grilled peach chicken recipe. The sweetness of the peaches will nicely contrast with the savory pierogi, making each bite memorable.
Experiment with Sauces
Don’t shy away from experimenting with sauces! A drizzle of balsamic reduction can add a hint of sweetness and acidity, enhancing the flavors in your dish. Alternatively, serving a vibrant creamy balsamic dressing on the side allows guests to customize their experience further.
Finishing Touches
Finally, a sprinkle of fresh herbs, such as chives or dill, can bring your pierogi dish to life. Choose herbs that align with the filling of your dumplings. If they are potato and cheese, chives work excellently. The color and freshness will not only make the dish visually appealing but will also enhance the overall flavor profile.
With these serving suggestions in mind, your pierogi recipe will surely impress and satisfy. Enjoy the versatility of these dumplings and let your creativity shine!
Variations of Pierogi Recipe You Can Try:
When exploring the delightful world of pierogi, think beyond the classic fillings. You can experiment with a variety of delicious ingredients. For instance, try a savory avocado filling inspired by this avocado chicken salad recipe, which adds a creamy twist. Alternatively, a sweet option could feature spiced pumpkin, showcasing the comforting tastes of fall. For a unique approach, consider a fusion pierogi filled with cheesy goodness, paired with caramelized onions for depth. Additionally, don’t shy away from global influences; stuffed with spicy beans or fresh herbs can add a refreshing change. Each variation of this pierogi recipe brings a unique flavor, making them perfect for any occasion!
Frequently Asked Questions (FAQs):
What are pierogi made of?
Pierogi are a delightful Polish dumpling filled with various ingredients. Typically, the dough comprises flour, water, and salt, creating a soft, pliable outer layer. As for the fillings, they can range from savory options like mashed potatoes and cheese to sweet versions filled with fruit. This versatility makes pierogi a beloved dish for every meal occasion.
How do you cook pierogi?
Cooking pierogi is quite straightforward. They can be boiled, pan-fried, or baked, providing different textures and flavors. Boiling is the traditional method where they’re added to salted water until they float, indicating they’re ready. After boiling, some prefer to sauté them in butter for a crispy exterior. Whichever method you choose, serving them with sour cream adds a lovely tang.
Can pierogi be frozen?
Absolutely! In fact, making a large batch and freezing them is a great way to enjoy pierogi at your convenience. Simply boil them as usual, allow them to cool, and then freeze on a baking sheet before transferring them to a freezer bag. When you’re ready to enjoy them, cook straight from frozen, adding a couple of minutes to the cooking time.
What is the best filling for pierogi?
The best filling for pierogi largely relies on personal preference. Classic options include potato and cheddar, sauerkraut, or meat. For a sweet treat, consider fruit fillings like blueberry or cherry. If you’re looking for something more unique, try experimenting with blends, much like with the delicious ingredients found in the Creamy Balsamic Dressing recipe that highlights different flavors.
How long do pierogi last in the fridge?
When stored properly, cooked pierogi can last in the refrigerator for up to three days. Make sure to keep them in an airtight container to maintain freshness. If you have leftover uncooked pierogi, they can also be refrigerated for a day or two before cooking.
Can I make pierogi dough ahead of time?
Yes, making pierogi dough ahead of time is a fantastic idea. You can prepare the dough, wrap it tightly in plastic wrap, and store it in the fridge for up to 24 hours. This allows for easy assembly of your pierogi when you’re ready to cook. Just ensure you let it sit at room temperature for about 30 minutes before rolling it out for the best results.
[tasty-recipe id=”5894″]


Leave a Comment