
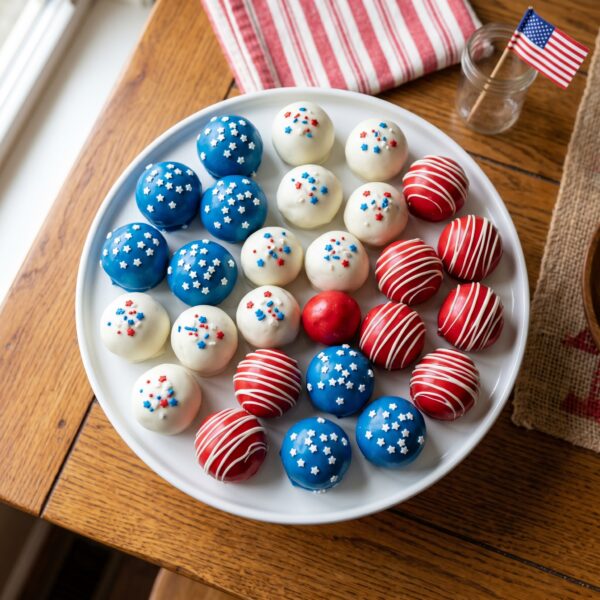
Every Fourth of July I want something festive to set out, but I also don’t want to be stuck baking in a hot kitchen. That’s where these come in. They’re no-bake, they look adorable in red, white, and blue, and people can’t seem to stop popping them. The first batch I ever made, though, I rushed the dipping before the balls had chilled, and they fell apart right off the fork into the melted candy. Lesson learned. These need their time in the fridge.
What I love is how simple they are. You crush up Oreos, mix them with cream cheese, roll them into balls, and dip them in colored candy melts. That’s the whole thing. No oven, just a little patience while they chill. The red and blue candy melts plus a drizzle of white and some star sprinkles give you that patriotic look without any fancy decorating skills.
Here’s the kitchen tip that keeps them from crumbling. Chill the rolled balls before you dip them. Give them a good two hours in the fridge, or fifteen to twenty minutes in the freezer if you’re short on time. Cold, firm balls hold their shape when you dip them in the warm candy. Skip this and they’ll crack and fall apart in the coating, which is exactly what happened to me.
And take it slow with the candy melts. Melt them gently, stirring every thirty seconds so they don’t seize up on you. Dip one ball at a time with a fork, tap off the excess, and add your sprinkles right away while the coating’s still wet so they stick. You’ll have a tray of festive little treats in no time, and they look great on a white platter for a crowd.
Why You’ll Love This Recipe
The texture is rich and creamy. Crushed Oreos mixed with cream cheese make a soft, fudgy center under the crisp candy shell.
They look festive with no fuss. Red, white, and blue candy melts and star sprinkles give you a patriotic treat without any real decorating skill.
They’re completely no-bake. Just crush, mix, roll, chill, and dip, so you never have to turn on the oven.
They’re a crowd favorite. These little balls disappear fast at gatherings, and a single batch makes plenty to share.
Ingredients
Here’s everything you’ll need:
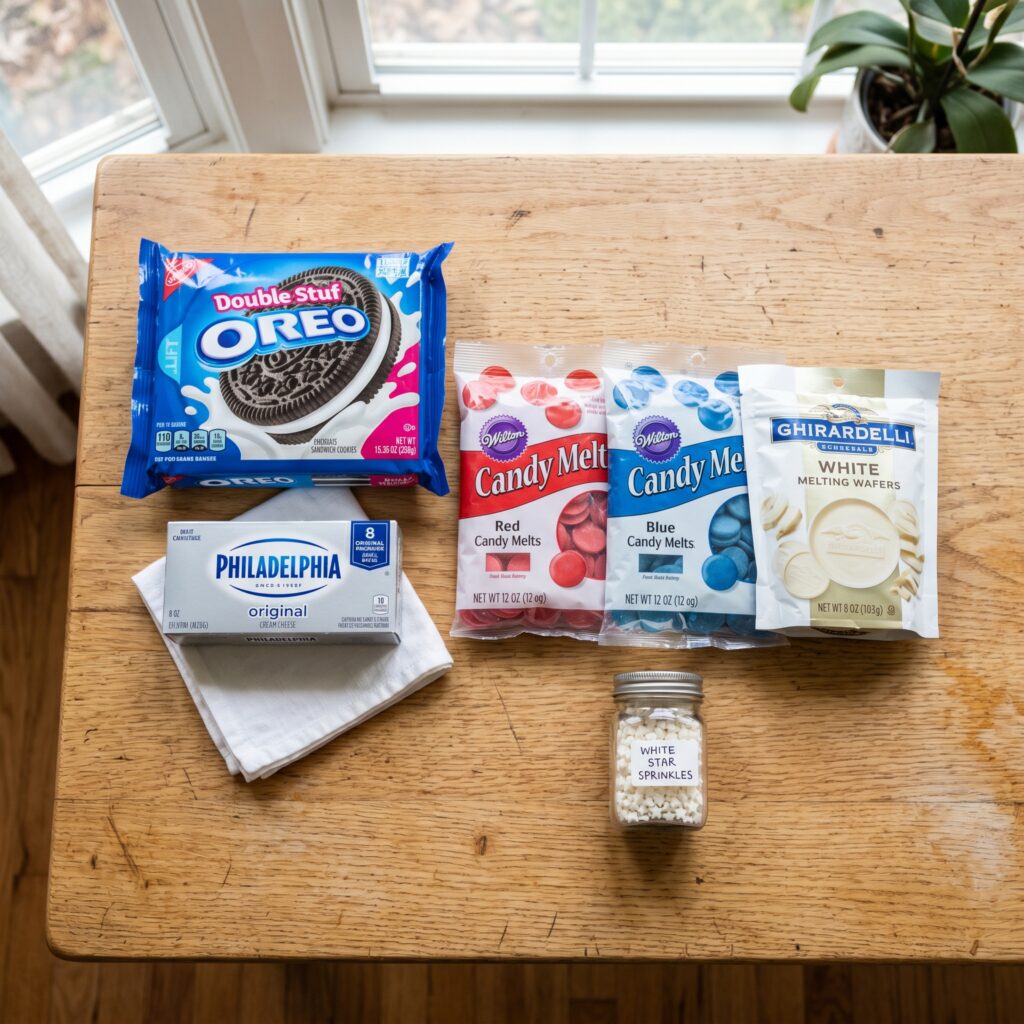
- 1 lb 2.12 oz family size package Oreo cookies
- 8 ounce block cream cheese, softened
- 12 ounce bag red candy melts
- 12 ounce bag blue candy melts
- 1/3 cup Ghirardelli white melting wafers
- White star confetti sprinkles, for topping
How to Make Patriotic Oreo Balls
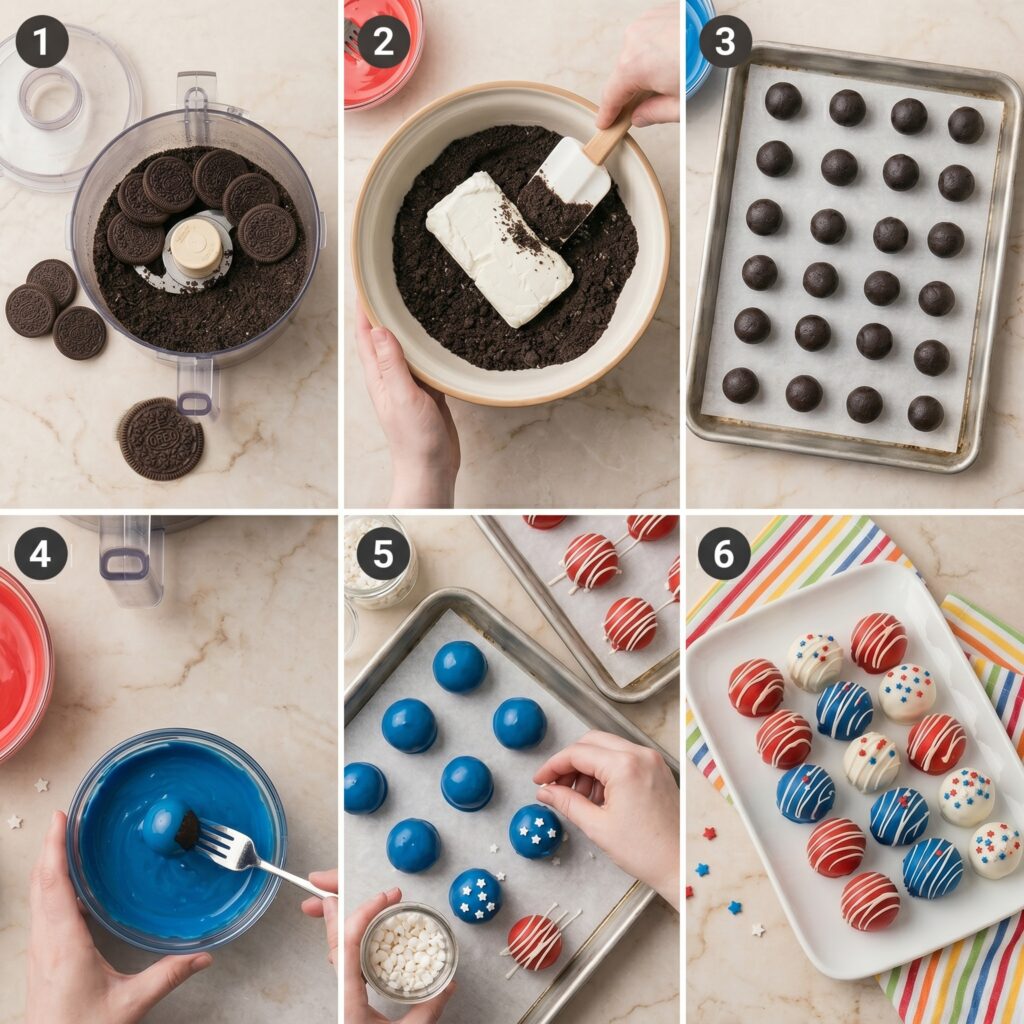
1. Crush the Oreos
Line two baking trays with parchment. Pulse the Oreo cookies in a food processor or blender into fine crumbs. You want them broken down well so the mixture holds together smoothly.
2. Mix the Filling
Beat the softened cream cheese with a hand mixer until smooth, then add the Oreo crumbs and mix on medium until well combined. The cream cheese is what binds everything into a soft, fudgy dough.
3. Roll the Balls
Use a 1.5 inch cookie scoop to portion even balls, then roll each one smooth in your palms. Place them on the trays in even amounts so they’re easy to coat later.
4. Chill Them
Put the trays in the fridge to chill for two hours, or freeze them for fifteen to twenty minutes if you’re short on time. This firms them up so they hold their shape when dipped.
5. Dip in Blue
Melt the blue candy melts gently, stirring every thirty seconds until smooth. Dip one chilled ball at a time with a fork, tap off the excess, and sprinkle with white stars right away. Chill to set.
6. Dip in Red and Drizzle
Melt the red candy melts and dip the second tray of balls the same way. Melt the white wafers in a piping bag, snip the tip, and drizzle white lines over the red balls. Chill ten minutes to set.
Expert Tips
Chill the balls before dipping. Cold, firm centers hold their shape instead of crumbling into the warm candy.
Soften the cream cheese first. Room-temperature cream cheese blends smooth with the crumbs without lumps.
Melt the candy slowly. Stir every thirty seconds so it stays smooth and doesn’t seize up on you.
Add sprinkles right after dipping. The wet coating holds the stars in place, so don’t wait or they won’t stick.
Tap off the excess candy with the fork. It keeps the coating thin and neat instead of thick and pooled.
Recipe Variations and Add-ins
You can use Golden Oreos in place of regular for a different flavor in the center.
Drizzle white over the blue balls too, or red over the white, for more variety on the platter.
You can swap the star sprinkles for red, white, and blue nonpareils or jimmies.
Roll some balls plain and coat them all in white candy melts with colorful sprinkles for a simpler look.
You can add 1/2 teaspoon of vanilla or peppermint extract to the filling for a flavor twist.
What to Serve With This Recipe
Set them out on a white platter at a cookout. The bright colors stand out. They make an easy grab-and-go treat.
Pair them with a bowl of fresh berries. The fruit keeps the dessert table colorful. The two round out the spread.
Serve them alongside lemonade or iced tea. The cold drinks suit the rich treats. It’s a festive combo for a hot day.
How to Store This Recipe
Keep the Oreo balls in an airtight container in the fridge until you’re ready to serve. The candy coating stays firm and the centers stay soft and fudgy when they’re kept cold.
They hold up well for several days chilled, which makes them easy to make ahead for a party. You can also freeze them longer term, then thaw in the fridge before serving.


Leave a Comment