
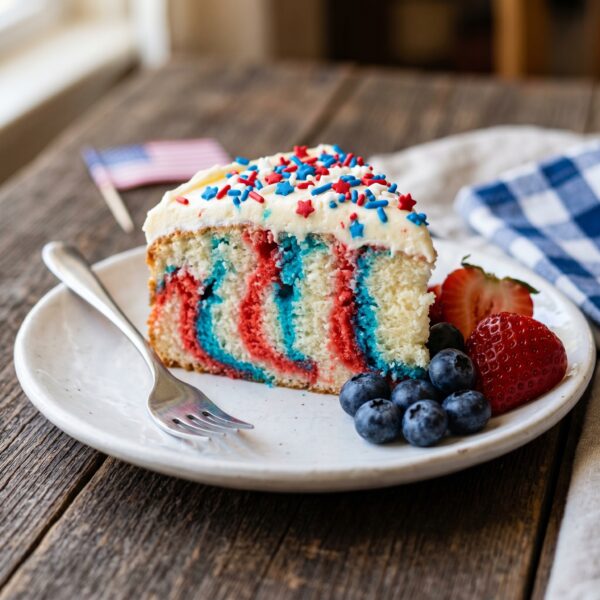
When the Fourth rolls around, I want a dessert that’s festive but doesn’t keep me trapped in the kitchen while everyone else is at the lake. This poke cake is exactly that. It’s a simple white cake with red and blue jello poked right into it, topped with creamy white frosting, so it ends up looking like the flag without a lick of fancy decorating. The first time I made a poke cake, I poured the jello over while the cake was still hot, and it just soaked in everywhere into a muddy mess instead of those pretty stripes. Cooling it a bit first is the trick.
What I love is how much you can do ahead. You bake the cake, poke it, pour in the jello, and let it chill overnight, and the frosting can be made days early too. That means less time fussing and more time at the barbecue. It uses a boxed cake mix to keep things quick, but you can make it from scratch if you’d rather. Either way, it’s about as easy as a festive cake gets.
Here’s the kitchen tip that gives you those clean stripes. After you bake the cake, let it cool for about fifteen minutes before you poke the holes and add the jello. Poke holes every half inch or so with a skewer or fork, then alternate squeezing the red and blue jello over the top. Alternating the colors as you go is what gives you that nice striped look instead of a blur of purple.
And don’t rush the chill. Once the jello’s in, cover the cake and let it sit in the fridge for at least three hours, ideally overnight. That sets the jello into the cake and keeps it super moist. You’ll have a tender, colorful cake ready for frosting. Fold the whipped topping gently into the cream cheese frosting so it stays light, spread it over the top, and finish with sprinkles or fresh fruit.
Why You’ll Love This Recipe
The cake stays super moist. The jello soaks right into the poke holes, keeping every slice tender and full of flavor.
The colors look festive. Red and blue jello stripes under white frosting give you a patriotic flag look with no fancy decorating.
It’s mostly make-ahead. The cake chills overnight and the frosting can be made days early, so you spend less time in the kitchen.
It’s easy to customize. Swap the jello flavors to match any theme, so it works for birthdays and parties too.
Ingredients
Here’s everything you’ll need:
For the cake:
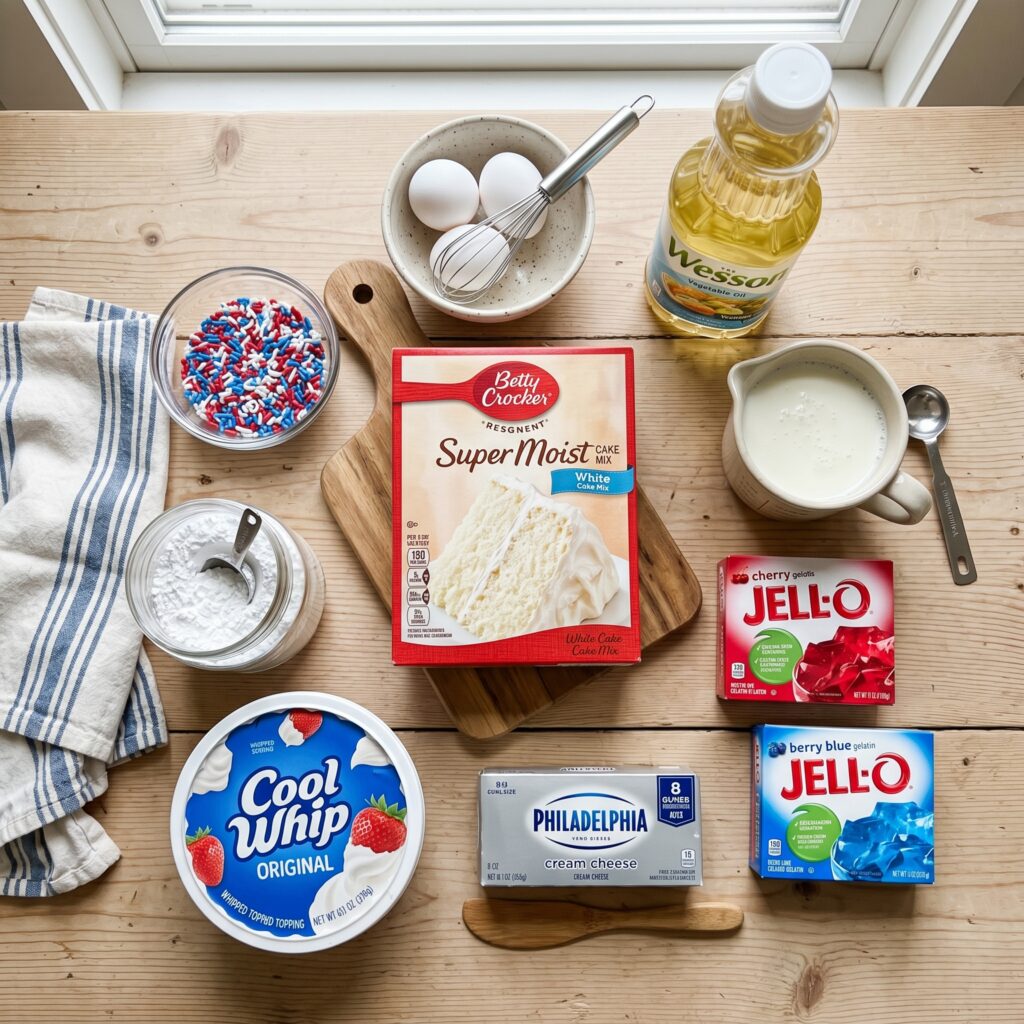
- 1 box white cake mix
- 4 large eggs, room temperature
- 1/2 cup vegetable or canola oil
- 1 cup buttermilk
- 1 small box (3.4 oz) cherry gelatin (you’ll use half)
- 1 small box (3.4 oz) berry blue gelatin (you’ll use half)
- 1 cup boiling water, divided
- 1/2 cup cold water, divided
For the frosting:
- 1 (8 oz) container whipped topping, thawed
- 1 (8 oz) package cream cheese, softened
- 1/2 cup powdered sugar
- 1 teaspoon vanilla extract
Optional toppings:
- Sprinkles
- Fresh fruit
How to Make 4th of July Cake

1. Bake the Cake
Heat the oven to 350 and coat a 13×9 baking dish with cooking spray. Whisk the cake mix, eggs, buttermilk, and oil until smooth, spread it in the dish, and bake about 25 minutes until a toothpick comes out clean. Cool for fifteen minutes.
2. Mix the Jello
While the cake cools, stir half the cherry gelatin into 1/2 cup boiling water for two minutes until dissolved, then add 1/4 cup cold water. Pour it into a squeeze bottle. Repeat with the blue gelatin in a second bottle.
3. Poke the Holes
Use a wooden skewer or large fork to poke holes into the cake about every half inch. Letting the cake cool a bit first keeps the holes clean instead of closing up.
4. Add the Jello
Carefully squeeze the gelatin over the cake, alternating between red and blue to get that striped look. Going back and forth keeps the colors distinct instead of blurring together.
5. Chill It
Cover the cake with foil or plastic wrap and chill it in the fridge for at least three hours, or overnight. This sets the jello into the cake and keeps it nice and moist.
6. Frost and Serve
Beat the cream cheese smooth, add the powdered sugar and vanilla, then fold in the whipped topping gently. Spread it over the cooled cake and finish with sprinkles or fresh fruit.
Expert Tips
Let the cake cool before poking holes. Cooling a bit first keeps the holes open so the jello fills them cleanly.
Alternate the red and blue jello. Going back and forth as you squeeze gives you stripes instead of a muddy blur.
Use room-temperature eggs. They help the cake bake evenly and rise properly.
Chill the cake at least three hours. That sets the jello in and keeps the cake super moist.
Fold the whipped topping in gently. A light hand keeps the frosting fluffy instead of dense.
Recipe Variations and Add-ins
You can use any jello flavors to match a theme, like strawberry and lemon for a different look.
Skip the jello and swirl red and blue food coloring into the batter for a tie-dye effect instead.
You can tint the frosting red and blue and pipe it into a flag design on top.
Arrange blueberries and sliced strawberries on top to mimic the stars and stripes.
You can make the cake from scratch with a basic vanilla recipe in place of the boxed mix.
What to Serve With This Recipe
Serve a slice with fresh berries on the side. The fruit keeps the plate colorful. The two suit a summer party.
Pair it with a scoop of vanilla ice cream. The cold cream rounds out the cake. It makes dessert feel special.
Set it out after a barbecue. The light cake follows the rich meal. It ends the meal on a festive note.
How to Store This Recipe
Cover the decorated cake with plastic wrap or foil and keep it in the fridge. It stays moist and fresh for up to two days, though it may dry out a little if left longer.
You can make the frosting a day or two ahead and store it in an airtight container in the fridge, just give it a stir before spreading. You can also freeze the plain cooled cake, wrapped well, for up to three months.

Leave a Comment