

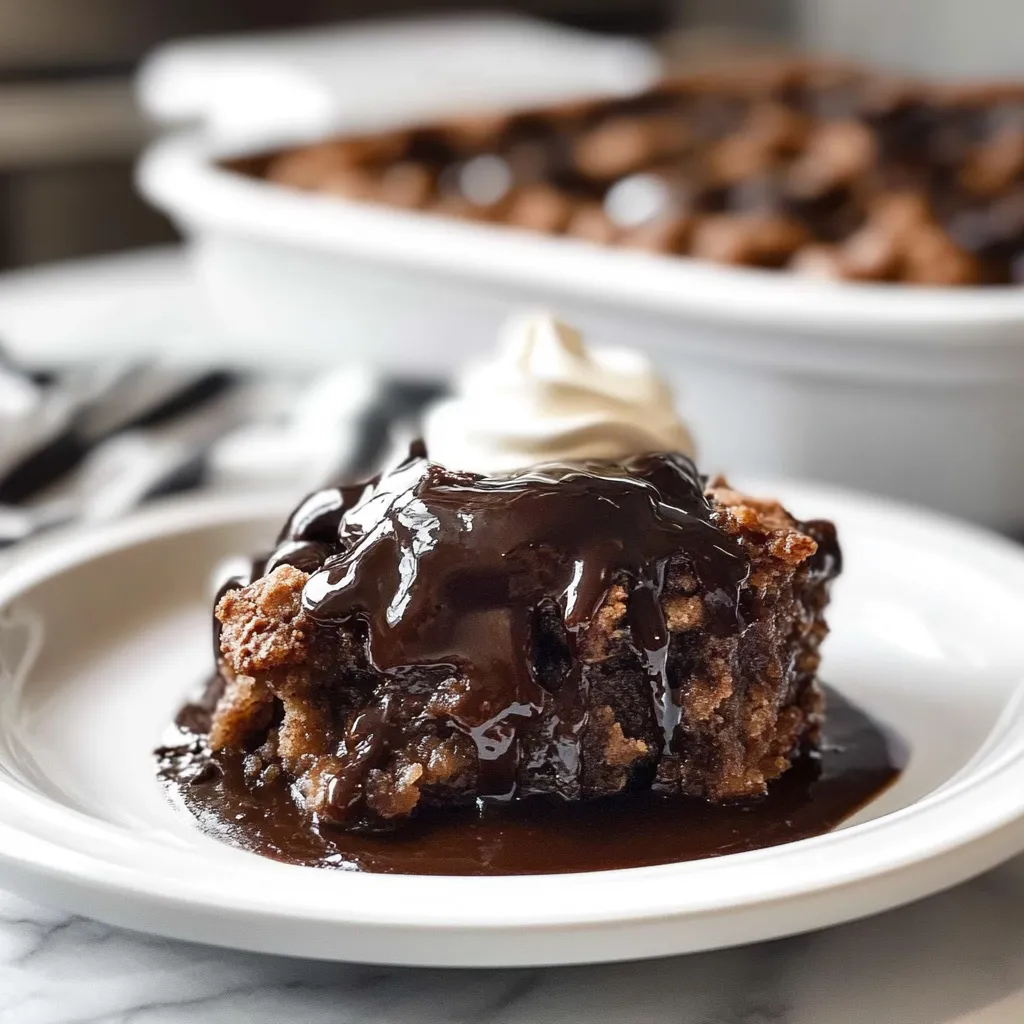
Chocolate Cobbler: A Hug in Dessert Form
There’s something undeniably heartwarming about dessert recipes that take us back to simpler times. I remember rainy afternoons at my grandma’s house, the gentle sound of raindrops tapping on the window, and the tantalizing aroma wafting from her kitchen. She would whip up a batch of her famous Chocolate Cobbler, and suddenly, all the chaos outside melted away. Just one slice, and I was wrapped in a cozy blanket of chocolatey goodness and nostalgia.
That’s why I absolutely love sharing this Chocolate Cobbler recipe with you! It’s one of those desserts that feels like a warm hug, perfect for any occasion but especially on those gloomy days when you just need a little pick-me-up. And the best part? It’s incredibly easy to make, which means you can enjoy it without spending all afternoon in the kitchen.
Why You’ll Love This Recipe
- Quick to prepare: Perfect for a last-minute sweet fix!
- Decadent flavor: Rich chocolatey delight in every bite.
- Comforting dessert: Ideal for snuggling up with a good book or movie.
- Budget-friendly: Simple ingredients that won’t break the bank.
- Customizable: Add your own twist with toppings or flavors!
Ingredients
Here’s what you’ll need to create this delightful Chocolate Cobbler:
- 1 cup all-purpose flour
- 1 cup granulated sugar
- 2 teaspoons baking powder
- 1/4 teaspoon salt
- 1/2 cup whole milk (or any milk you have on hand)
- 1/2 cup unsalted butter, melted
- 1 teaspoon vanilla extract
- 1/2 cup unsweetened cocoa powder
- 1 1/2 cups hot water
- 1 cup brown sugar, packed (this adds a lovely caramel flavor!)
- 1/2 cup chocolate chips (optional, but suggested for extra chocolatey goodness)
Tip: Freshly grated nutmeg or a splash of almond extract can elevate your cobbler’s flavor profile!
Step-by-Step Instructions
Ready to dive in? Let’s bring this Chocolate Cobbler to life with some simple steps!
- Preheat your oven: Set it to 350°F (175°C). This ensures your cobbler bakes evenly and beautifully.
- Mix dry ingredients: In a large bowl, combine flour, granulated sugar, baking powder, cocoa powder, and salt. Whisk them together until well mixed.
- Add wet ingredients: Pour in the milk, melted butter, and vanilla extract. Stir until just combined, but remember: don’t overmix! A few small lumps are totally fine.
- Prepare a baking dish: Grease a 9×13-inch baking dish. Pour the batter evenly into the dish—this will be the base of your cobbler.
- Make the magic happen: In a separate bowl, mix the brown sugar with the hot water. Carefully pour this over the batter in the baking dish. Don’t stir it! This creates that delectable chocolate sauce beneath the cobbler.
- Add chocolate chips: If you’re feeling particularly indulgent (and why not?), sprinkle the chocolate chips on top. This is mandatory in my opinion!
- Bake it: Place the dish in the preheated oven and bake for 30-35 minutes, or until the top looks slightly firm to the touch but the center is still soft. The aroma filling your kitchen will be absolutely heavenly.
- Cool and serve: Allow your cobbler to cool for a few minutes before serving. This helps the chocolate sauce settle a bit. It’s great warm or at room temperature!
Watch-out: If it’s your first time making this, keep an eye on it during baking! An overbaked cobbler can turn out dry, and nobody wants that!
Pro Tips & Variations
Now that you’ve mastered the classic Chocolate Cobbler, here are a few fun twists to keep things exciting:
- Spice it up: A pinch of cinnamon or cayenne pepper can add a delightful kick to the chocolate.
- Nutty addition: Chopped walnuts or pecans sprinkled atop before baking add a lovely crunch.
- Fruit twist: Fresh raspberries or strawberries folded into the batter give it a fruity flair!
- Dairy-free option: Swap out the butter and milk for coconut oil and almond milk for a delicious dairy-free treat.
Feel free to get creative and adjust the recipe to your taste. Cooking should be fun, after all!
Serving Suggestions
When it comes to serving your Chocolate Cobbler, think cozy and comforting. Here’s how I love to enjoy it:
- Classic duo: Serve it warm right out of the oven with a scoop of vanilla ice cream melting on top. Pure bliss!
- Rich and creamy: Drizzle with heavy whipped cream for that extra touch of indulgence.
- With coffee: Pair it with a cup of coffee or a rich hot chocolate for a real treat on cold days.

Storage Tips
If you happen to have leftovers (though I doubt it!), here are some quick tips to keep your Chocolate Cobbler fresh:
- Refrigerate: Store in an airtight container in the fridge for up to 4 days.
- Freeze: Wrap individual portions in plastic wrap and place them in a freezer bag for up to 3 months. Just thaw in the fridge overnight when you’re ready to indulge again!
- Reheat: Warm it in the microwave for 30-40 seconds or in the oven at 350°F (175°C) until heated through. Just be careful not to overheat it, as you don’t want to lose that gooey chocolatey goodness!
FAQs
Can I use a different kind of milk?
Absolutely! Almond milk, oat milk, or even coconut milk work great as substitutes. Just keep in mind that some alternatives may slightly alter the flavor.
How can I make this recipe gluten-free?
Simply swap out the all-purpose flour for a 1:1 gluten-free flour blend. Make sure the blend includes xanthan gum for the best results!
What’s the best way to serve it?
While it’s delicious on its own, it’s heavenly with a scoop of vanilla ice cream or a dollop of whipped cream. The warm cobbler pairs perfectly with something cool and creamy!
Can I double the recipe?
You can definitely double the recipe for a crowd! Just be sure to use a larger baking dish and adjust your baking time slightly. It may take a bit longer, so keep an eye on it!
Can I add fruit to my Chocolate Cobbler?
Sure! Cherries, raspberries, or even diced apples can be folded into the batter right before baking for a fruity twist!
Conclusion
I can’t wait for you to try this Chocolate Cobbler recipe! It’s such a comforting treat that will fill your home with a delightful aroma and your heart with warmth. Once you make it, I hope you’ll come back and share how it turned out or if you added your own special touch. Cooking is best when shared with friends, so let’s connect in the comments below!

Leave a Comment