

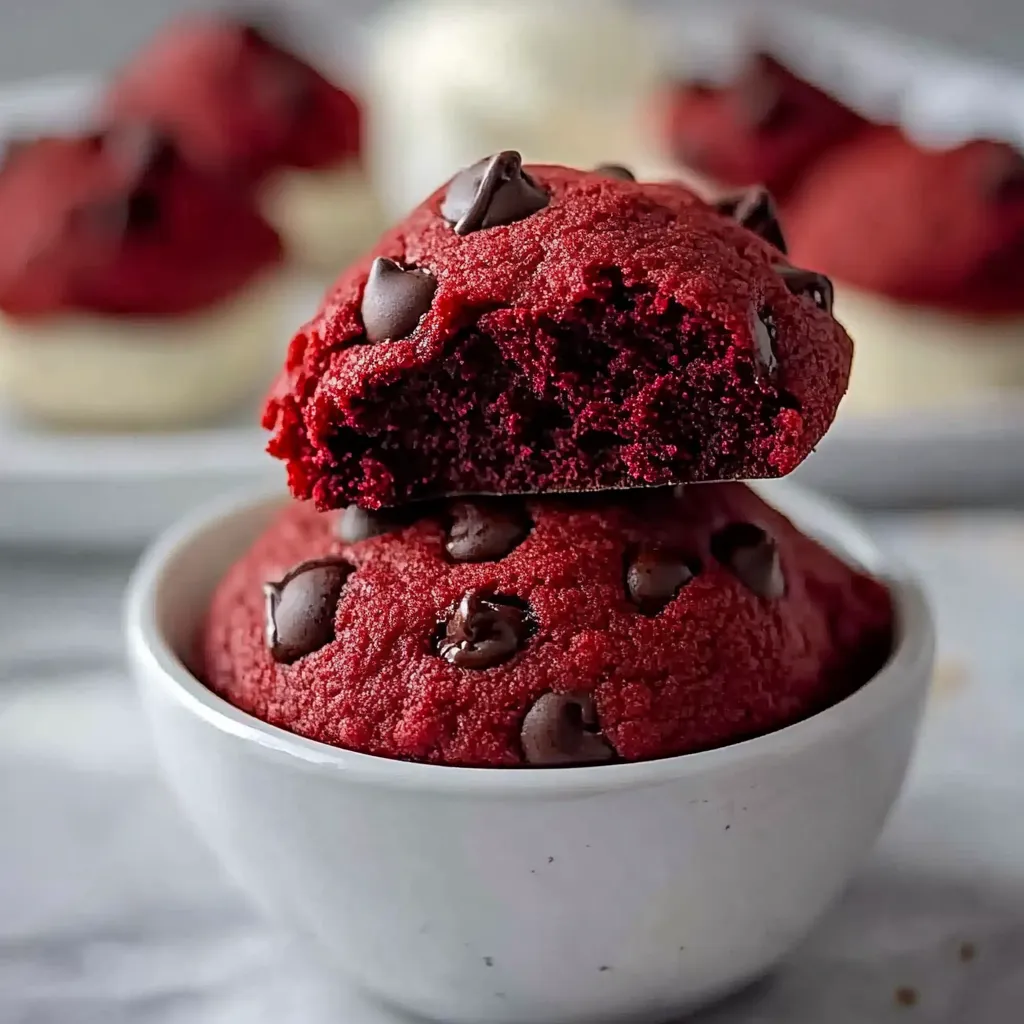
Oh, the joy of red velvet! Just the mention of it whisks me back to those cozy, bustling holiday gatherings at my grandma’s house. The aroma of chocolate mingling with that faint, sweet tang of buttermilk filled the room, wrapping us all in its warm embrace. Every year, there would be a competition of sorts—who could bake the best red velvet cake? But little did I know, my true love was hiding in the shadows of that rich, velvety dough. Yes, today we’re diving into the realm of Red Velvet Cookie Dough. This delightful treat is not only fun to make but will also leave you and your loved ones swooning with delight!
You can whip up this delicious cookie dough with minimal fuss, satisfying that sweet tooth while basking in the warm, inviting colors of the holiday season. If you’ve ever wanted to transport the magic of red velvet cake into a chewy, yummy cookie, you’ve arrived at the perfect destination.
Why You’ll Love This Recipe
- It’s an instant crowd-pleaser—everyone loves red velvet!
- Simple ingredients you probably already have in your pantry.
- Perfect for cookie dough lovers who might not want to bake (yes, I see you!).
- Great for parties, cookie jars, or just a soothing treat after a long day.
- Can easily be adapted for dietary restrictions!
Ingredients
Let’s gather our supplies and get ready to create this scrumptious Red Velvet Cookie Dough! Here’s what you’ll need:
- 2 ½ cups all-purpose flour
- 1 cup unsweetened cocoa powder (the real deal for that deep color)
- 1 tsp baking soda
- ½ tsp salt
- 1 cup unsalted butter, softened to room temperature
- 1 cup granulated sugar
- 1 cup brown sugar, packed (for that extra chewiness!)
- 2 large eggs
- 2 tbsp red food coloring (gel is best for vibrant color)
- 1 tsp vanilla extract
- 1 cup white chocolate chips (a delightful twist on traditional chocolate!)
- ½ cup walnuts or pecans, chopped (optional, but oh-so-yummy!)
Note: Make sure your butter is at room temperature. If it’s cold, your dough will end up too stiff, and we want it to be wonderfully soft and mixin’!
Step-by-Step Instructions
Now that we have everything ready, let’s roll up our sleeves and get started! This is where the magic truly begins.
- Preheat the oven: If you’re planning to bake these cookies right away, preheat your oven to 350°F (175°C). If you want to enjoy the cookie dough raw, you can skip this step!
- Mix the dry ingredients: In a medium-sized bowl, whisk together the flour, cocoa powder, baking soda, and salt. This ensures that everything is evenly distributed and avoids that awkward pocket of saltiness in your finished cookies.
- Beat the butter and sugars: In a large mixing bowl, cream together the softened butter, granulated sugar, and brown sugar until it’s light and fluffy. You should beat it for about 2-3 minutes—this adds air and gives your cookies that delightful texture!
- Incorporate the eggs and color: Add in the eggs, red food coloring, and vanilla extract to the butter mixture. Mix until it’s all combined. Honestly, watching that vibrant red color swirl in is a treat in itself!
- Combine wet and dry: Gradually add the dry ingredients into the wet mixture, mixing until just combined. Watch out: overmixing can lead to dense cookies! We want them soft and chewy.
- Fold in the goodies: Gently fold in the white chocolate chips and nuts, if using. You want an even distribution without overworking the dough!
- Chill (optional): For an extra chewy cookie, chill the dough in the refrigerator for at least 30 minutes. It helps the flavors deepen and the texture firm up.
- Scoop and bake: If you’re ready to bake, scoop tablespoons of dough onto a lined baking sheet, leaving enough space for spreading—around 2 inches apart is perfect. Bake in the preheated oven for 10-12 minutes or until the edges are set but the centers are still soft.
- Cool and enjoy: Allow the cookies to cool on the sheet for 5 minutes before transferring them to a wire rack. The smell wafting through your kitchen? Pure bliss!

Pro Tips & Variations
This recipe is like a canvas—feel free to dazzle it with your creativity! Here are a few suggestions for twists:
- Try using dark chocolate chips instead of white for a richer flavor.
- Add a teaspoon of almond extract for a subtle nutty twist.
- Feeling adventurous? How about adding a sprinkle of cinnamon for a warm spice effect?
- If you’re gluten-free, swap the all-purpose flour with an equally measured gluten-free blend.
- For a fun stuffing twist, scoop two tablespoons of dough, flatten them, place a Rolo or Kisses chocolate in the center, and wrap it up!
Serving Suggestions
These Red Velvet Cookies are utterly divine on their own, but pair them with a hot cup of coffee, a scoop (or two) of vanilla ice cream, or even a tall glass of milk. Imagine sinking your teeth into a warm cookie, its soft center mingling with the coolness of ice cream. Heavenly!
If you’re sharing these delectable treats at a party, consider stacking them on a rustic platter with some fresh raspberries or strawberries for that pop of color. It adds a beautiful touch to your spread!
Storage Tips
Not that these cookies will last long, but if by some miracle you have leftovers, here’s how to keep them fresh:
- Room temperature: Store in an airtight container at room temperature for up to one week. They’ll stay soft and chewy!
- Refrigeration: To extend freshness, keep them in the fridge for up to ten days. Just bring them back to room temperature before devouring.
- Freezing: You can freeze the cookie dough! Just scoop the unbaked dough onto a baking sheet, freeze until solid, then transfer to a zip-top bag. It can live in the freezer for up to three months. When ready to bake, you can add an extra minute or two to the baking time.
FAQs
Can I eat the cookie dough raw?
Yes, you can! This dough is made with cooked flour, so it’s safe to enjoy raw. Just remember, if you’re planning to eat it raw, you might want to skip the baking powder to avoid any unwanted baking antics!
Can I use other types of chocolate instead of white chocolate chips?
Absolutely! Dark chocolate or semi-sweet chocolate chips would work wonderfully as well. It’s all about your personal taste!
What can I substitute for red food coloring?
If you prefer a natural alternative, consider beet juice! It gives a beautiful color and a hint of earthiness. Just be aware that the shade might lean more towards pink.
How do I know when the cookies are done?
A good rule of thumb is to look for slightly firm edges with a soft center. They might seem underbaked, but they will continue to set as they cool.
Can I make this recipe vegan?
Yes! Replace the eggs with a flax or chia egg (1 tablespoon ground flaxseed or chia mixed with 2.5 tablespoons water), use vegan butter, and make sure your chocolate chips are dairy-free. You’ll still enjoy those heavenly flavors!
How do I prevent my cookies from spreading too much?
Chilling the dough is key! If your cookies spread too much, you may also want to check that your butter isn’t melted or overly soft before mixing.
Is there a way to make these less sweet?
Of course! You can reduce the amount of sugar by ¼ cup in this recipe without compromising too much on texture. You could also attempt to swap in some unsweetened cocoa powder for part of the sweet cocoa to balance flavors.
What’s the best way to serve these cookies?
Enjoy them warm, straight out of the oven, or let them cool; either way, you can’t go wrong! A scoop of vanilla ice cream on top can take them to the next level!
Can I use a cookie press with this dough?
Definitely! Just be sure to chill the dough first to help it hold its shape better when extruded through the press.
Conclusion
I hope you feel inspired to whip up a batch (or two) of this delightful Red Velvet Cookie Dough! Whether it’s for a cozy evening at home, a gathering with friends, or just a little self-love treat, you’ll find that these cookies hold a special place in your heart, just like they do in mine. Don’t forget to comment below and let me know how your baking adventure goes. I can’t wait to hear about your delicious creations!

Leave a Comment