
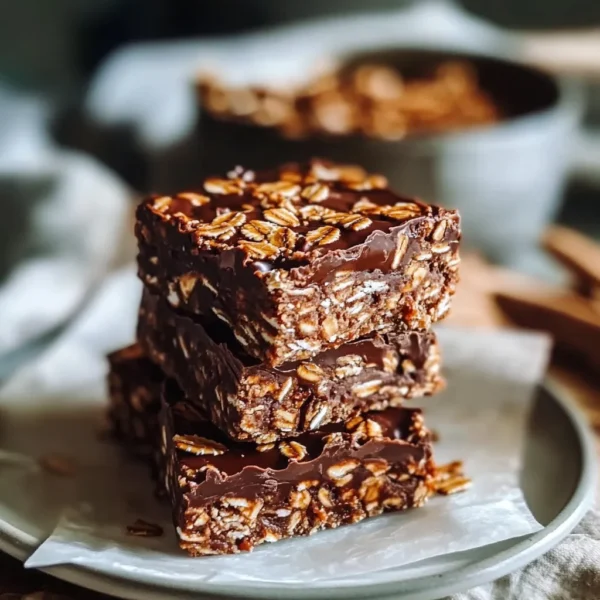
There’s something just so comforting about a no-bake treat, don’t you think? It’s like the universe is giving you a big warm hug. As the weather starts to cool down, I find myself craving something sweet yet satisfying—like these No-Bake Chocolate Oat Bars. I remember the first time I made them; it was one of those rainy afternoons where the skies were dreary, but my kitchen was filled with the rich aroma of cocoa and vanilla. I couldn’t wait to share them with my family, and as they took their first bites, their smiles lit up the room. They instantly became a go-to recipe for potlucks, movie nights, and those unexpected “I need dessert now” moments.
If you’re on the hunt for a quick, delicious, and healthier indulgence, you’ve just stumbled upon the perfect recipe! These No-Bake Chocolate Oat Bars are not just yummy; they’re also packed with wholesome ingredients that make you feel good about snacking. Let’s dive into this delightful recipe together!
Why You’ll Love This Recipe
- Quick and Easy: No baking required—just mix, set, and enjoy!
- Wholesome Ingredients: Oats, nut butter, and dark chocolate create a satisfying and guilt-free treat.
- Customizable: Make them your own with different add-ins like nuts or dried fruit.
- Family-Friendly: Perfect for kids and adults alike; everyone loves a rich chocolatey bar!
- Budget-Friendly: Minimal ingredients that won’t break the bank.
Ingredients
Gather these pantry staples—you might already have most of them on hand!
- 2 cups rolled oats
- 1 cup natural peanut butter (or almond butter for a nut-free option)
- 1/2 cup honey or maple syrup (for a vegan option)
- 1/4 cup unsweetened cocoa powder
- 1 tsp vanilla extract
- 1/4 tsp salt
- 1/2 cup dark chocolate chips (optional but highly recommended!)
Tip: Using fresh peanut butter with no added sugars will boost the flavor and health benefits even more!
Step-by-Step Instructions
Alright, my fellow food lover, let’s get cooking! Well, more like mixing. And then letting things chill out!
- Prepare your pan: Line an 8×8-inch square pan with parchment paper, letting the edges hang over for easy removal later.
- Mix the base: In a large mixing bowl, combine the rolled oats, cocoa powder, and salt. Stir them together to ensure an even distribution of the cocoa.
- Blend wet ingredients: In a separate bowl, mix together the peanut butter, honey (or maple syrup), and vanilla extract until smooth. If your peanut butter is hard, you can zap it in the microwave for a few seconds to soften it up.
- Combine: Pour the wet mixture into the dry ingredients and mix well with a spoon or spatula. You want everything to be well incorporated; it should be a thick, sticky mixture.
- Optional chocolate chips: Gently fold in the dark chocolate chips if you’re using them.
- Spread the mixture: Transfer the mixture into your lined pan, using a spatula to press it down evenly. Don’t be shy—press down firmly to make sure it all sticks together.
- Chill: Place the pan in the refrigerator for at least 2 hours, or until they’re firm. This is the perfect time to brew yourself a cup of tea or coffee!
- Slice and serve: Once they’re set, use the parchment paper to lift the bars out of the pan. Cut them into squares or bars, and enjoy!
Pro Tip: Don’t worry if they don’t look perfect; it’s all about taste! Plus, they’re going to disappear so fast, no one will notice.

Pro Tips & Variations
Now, let’s get a little creative with this recipe! Here are some fun twists you can try:
- Add-ins: Consider throwing in some chopped nuts (like almonds or walnuts) or dried fruit (like cranberries or raisins) for extra texture and flavor.
- Spices: Sprinkle a dash of cinnamon or a pinch of sea salt on top before chilling to enhance the flavor.
- Nut-Free Alternative: Swap out the peanut butter for sunflower seed butter for a nut-free version that’s still creamy and delicious.
- White Chocolate Swirl: Melt some white chocolate and drizzle it over the top for a pretty touch!
Feel free to experiment! The base of this recipe is versatile enough to welcome whatever deliciousness you want to add. The only limit is your creativity!
Serving Suggestions
These bars can be enjoyed on their own, but why not elevate your snacking experience? Here are some cozy serving suggestions:
- With a glass of milk: Nothing beats the classic combo of chocolate and milk. Whether you opt for dairy or plant-based, it’s a match made in heaven!
- Pair with coffee: The rich flavors of chocolate and oats complement a robust cup of coffee beautifully—perfect for an afternoon pick-me-up.
- With fresh fruit: Serve them alongside slices of banana or berries to brighten your plate and add a refreshing touch.
- As a dessert base: Crumble them over yogurt or ice cream for an extra layer of yum.
However you decide to serve them, I promise they’ll be a hit!
Storage Tips
These No-Bake Chocolate Oat Bars are perfect for meal prep or snacking whenever the mood strikes! Here’s how to keep them fresh:
- Refrigeration: Store them airtight in the fridge for up to one week. You can use a sealed container or wrap them individually in plastic wrap.
- Freezing: For longer storage, freeze individual bars wrapped in parchment paper and then stored in a freezer bag. They’ll keep for about 3 months!
- Reheating: If you prefer them slightly warm, pop them in the microwave for about 10-15 seconds. Just be careful not to melt them too much!
FAQs
Can I use quick oats instead of rolled oats?
Absolutely! Quick oats will work in a pinch, but rolled oats give the bars a heartier texture that I really enjoy. If you prefer a softer bar, quick oats will yield a slightly different but still delightful result.
What can I substitute for honey or maple syrup?
If you’re looking for alternatives, agave nectar or brown rice syrup work well, too! Just keep in mind that they might alter the sweetness and flavor slightly, so taste as you go!
Do these bars need to be refrigerated?
You don’t HAVE to refrigerate them, but they hold their shape and texture better when cold. Plus, they taste great straight from the fridge!
Can I veganize this recipe?
You sure can! Simply swap honey for maple syrup and opt for dairy-free chocolate chips. Voilà – you’ve got a vegan treat that everyone can enjoy!
How do I know when the bars are set and ready to slice?
After chilling in the fridge for at least 2 hours, they should feel firm to the touch. If you press on them gently and they hold their shape, they’re ready to come out and be sliced!
Conclusion
I hope you find as much joy in making (and devouring!) these No-Bake Chocolate Oat Bars as I do. They’re not just a treat; they’re a reminder to pause and savor life’s little indulgences. I’d love to hear how yours turn out! Have you added any fun twists? Don’t hesitate to drop a comment below and share your experience. Happy snacking!
Leave a Comment