

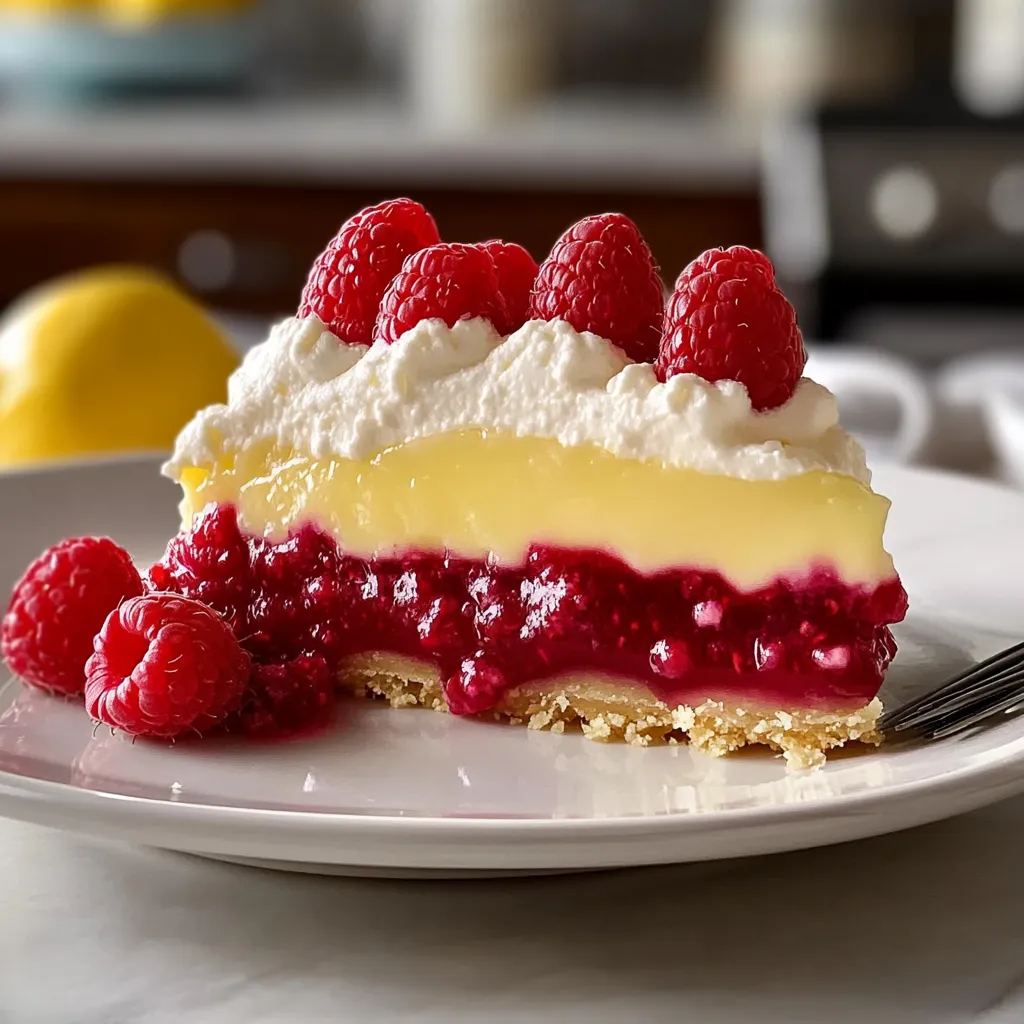
There’s something truly magical about summer desserts—like the feeling of warm sunshine on your skin and the sweet, tangy taste of ripe fruits bursting in your mouth. This Lemon Raspberry Layered Pie, my dear friends, is the quintessential summer treat that speaks to the heart. I’ll never forget the first time I brought this pie to a family reunion. The way the vibrant colors danced on the table, and the thoughtful pause everyone took before their first bite—it was pure bliss. The perfect balance of tart lemon and sweet raspberries, layered upon a flaky crust, brings back the fondest memories of sunny days and laughter echoing in the backyard.
This recipe is a testament to summer’s bounty—a delightful combination of flavors that not only looks impressive but is surprisingly easy to master. So, roll up your sleeves and let’s embark on this culinary journey together, as we master the art of lemon raspberry layered pie!
Why You’ll Love This Recipe
- Bright, zesty flavors that scream summer.
- Layered elegance that impresses without a lot of fuss.
- Perfect for any occasion—be it a potluck, picnic, or just because!
- Customizable with different fruits or toppings.
- Easy to make ahead of time—just chill and serve!
Ingredients
Let’s gather our ingredients, shall we? You’ll need the following:
- For the crust:
- 1 ½ cups all-purpose flour
- ½ teaspoon salt
- ½ teaspoon sugar
- ½ cup unsalted butter, cold and cubed
- 4-5 tablespoons ice water
- For the lemon filling:
- 1 cup granulated sugar
- 2 large eggs
- ½ cup fresh lemon juice (about 3-4 lemons)
- 1 tablespoon lemon zest
- 3 tablespoons cornstarch
- 1 cup water
- For the raspberry layer:
- 2 cups fresh raspberries
- ¼ cup granulated sugar
- 1 tablespoon lemon juice
- 2 teaspoons cornstarch
Note: Use fresh lemon juice for the best flavor—it’s worth it!
Step-by-Step Instructions
Now, let’s get down to business. Here’s how to make this fabulous pie:
- Prepare the crust: In a mixing bowl, combine flour, salt, and sugar. Add the cold, cubed butter and use your fingertips or a pastry cutter to mix until it resembles coarse crumbs. You want the butter to stay cold to create a flaky texture, so avoid overworking it!
- Add ice water: Gradually add the ice water, one tablespoon at a time, mixing until the dough comes together. Be careful not to overmix—this can ruin the texture!
- Chill: Form the dough into a disc, wrap it in plastic, and chill for at least 30 minutes.
- Roll out the crust: Preheat your oven to 375°F (190°C). On a floured surface, roll out the dough to fit a 9-inch pie pan. Transfer it to the pan and trim any excess dough hanging over the edges. Crimp the edges as desired for a lovely presentation.
- Bake the crust: Prick the bottom with a fork to prevent bubbling and bake for 20 minutes, or until lightly golden. Let it cool completely.
- Make the lemon filling: In a medium saucepan, whisk together sugar, eggs, lemon juice, lemon zest, and cornstarch. Add 1 cup of water and cook over medium heat, stirring constantly until it thickens (about 5-7 minutes). It should just start to bubble. Remove from the heat and allow it to cool slightly before pouring it into the baked crust.
- Prepare the raspberry layer: In another saucepan, combine fresh raspberries, sugar, lemon juice, and cornstarch. Cook over medium heat until the raspberries break down and the mixture thickens. This should take about 3-5 minutes. Let it cool before pouring it over the lemon layer.
- Layer it up: Once the lemon filling has cooled to room temperature, gently pour the raspberry mixture on top, spreading it evenly. Cover and refrigerate for at least 4 hours, or overnight if time allows.
Tip: Don’t rush the chilling time—allowing the pie to set enhances the flavor and makes slicing easier!

Pro Tips & Variations
This pie is practically a canvas waiting for your creative touch! Here are some pro tips and fun variations:
- Add a crunch: For a nutty twist, mix some crushed pistachios or almonds into the crust.
- Top it off: Whip up some fresh cream to dollop on each slice—because who wouldn’t love a little extra creaminess?
- Go berry crazy: Substitute the raspberries with blueberries, strawberries, or even a mix of berries for a colorful surprise.
- Flavor twist: Experiment with adding a hint of lime or orange juice to the filling for a citrus explosion.
Serving Suggestions
Serving this Lemon Raspberry Layered Pie is where the joy really begins! Picture this: a slice of that vibrant, multi-layered pie sitting on a white plate, the sunlight hitting it just right, creating a glistening effect. For a simple yet divine presentation, serve it with a dollop of whipped cream and a sprig of mint on the side. You could also pair it with a cup of freshly brewed iced tea or coffee—perfect for those warm afternoons. If you feel extra fancy, add a side of lemon sorbet for a refreshing touch!

Storage Tips
Got leftovers? (Though I doubt it—this pie is usually too good to last long!) But if you do, here’s how to keep it fresh:
- Refrigeration: Store the pie in an airtight container in the fridge for up to 3 days. The flavors will meld together beautifully.
- Freezing: You can freeze the pie before adding the raspberry layer. Wrap it tightly in plastic wrap and then in aluminum foil for up to 2 months. Just thaw in the fridge overnight before adding the raspberry layer and serving.
- Reheating: If you’re serving the pie cold, you won’t need to reheat it. But if you prefer a warm pie, pop individual slices in the microwave for about 15-20 seconds.
FAQs
Can I use frozen raspberries instead of fresh?
Absolutely! Just make sure to thaw and drain any excess moisture before cooking them down for the raspberry layer, as frozen berries tend to release more liquid.
How do I prevent the crust from getting soggy?
A great way to keep your crust nice and crisp is to blind-bake it (which we did by pricking it and baking it before adding the filling). Additionally, ensure that your filling isn’t too watery when poured into the crust.
Can I make this pie ahead of time?
Yes! This pie is perfect for making ahead of time. Prepare it the day before, let it chill overnight, and it’ll be ready to dazzle your guests the next day.
What if I don’t like lemon?
No worries! Swap the lemon filling for a different tart filling like lime or orange. The key is creating a balance between the sweet and tart flavors as that’s what makes this pie so special.
Conclusion
I hope you’re feeling as excited as I am to try this Lemon Raspberry Layered Pie! Cooking is all about creating memories and joy in the kitchen, and I can’t wait to hear about your own experiences making this colorful, delightful dessert. So grab your ingredients, invite a friend over, and let’s make some delicious memories together. Don’t forget to drop a comment below or share your creations with us. Happy baking! 🍋✨


Leave a Comment