
As the leaves begin to turn and the air takes on that crisp, slightly sweet scent of autumn, I can’t help but reminisce about those delightful childhood Halloween parties. You know the ones—the laughter, the decorations that threatened to scare you into the next room, and, of course, the treats. One of my all-time favorites has to be Marshmallow Rice Krispies Halloween Brains. These gooey, sweet, and delightfully creepy-looking treats were always a hit and now, I want to show you how to recreate that sense of joy and nostalgia in your own kitchen!
Picture this: a spooky Halloween gathering where kids and adults alike can’t resist taking a bite out of these wonderfully wobbly “brains.” They’re fun to make, great for parties, and, best of all, super simple! Let’s dive into this recipe together and make some eerie yet delicious marshmallow treats!
Why You’ll Love This Recipe
- Easy to make and perfect for kids of all ages—no baking required!
- Inexpensive ingredients that you likely already have at home.
- Customizable with different colors and toppings for a unique twist.
- Ideal for parties, Halloween school events, or just a fun treat for the family.
Ingredients
Here’s your shopping list to whip up these spooktacular treats:
- 6 cups Rice Krispies cereal
- 4 cups mini marshmallows (the gooier, the better!)
- 3 tablespoons unsalted butter
- 1 teaspoon vanilla extract
- Food coloring (red or pink for that brainy effect)
- Corning or powdered sugar (for dusting if desired)
- Gummy worms or other spooky candies (for decoration)
Tip: If you can find flavored marshmallows, like strawberry, they can add a fun twist to the flavor!
Step-by-Step Instructions
Ready to get your hands sticky and have some fun? Follow these steps:
- Start by preparing your workspace. Grease a big mixing bowl and a large baking sheet with some butter or cooking spray. This will prevent the mixture from sticking—trust me, you’ll thank me later!
- In a large pot, melt the butter over low heat. Keep an eye on it; you want it to melt gently without browning. As the butter melts, the sweet scent will fill your kitchen, making it feel like a warm hug!
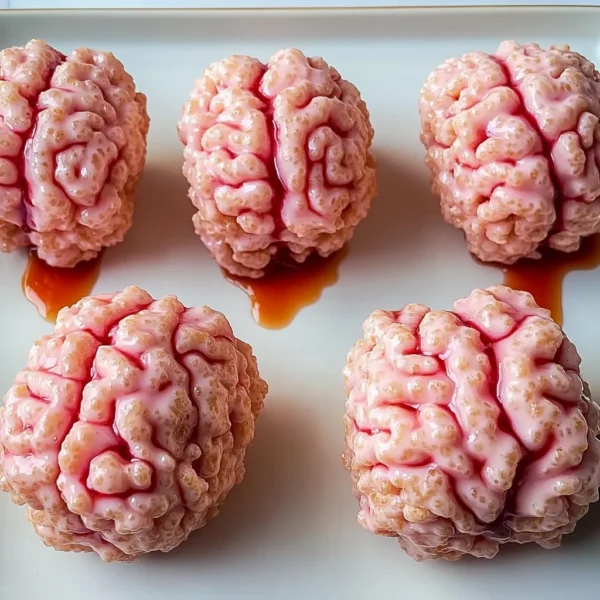
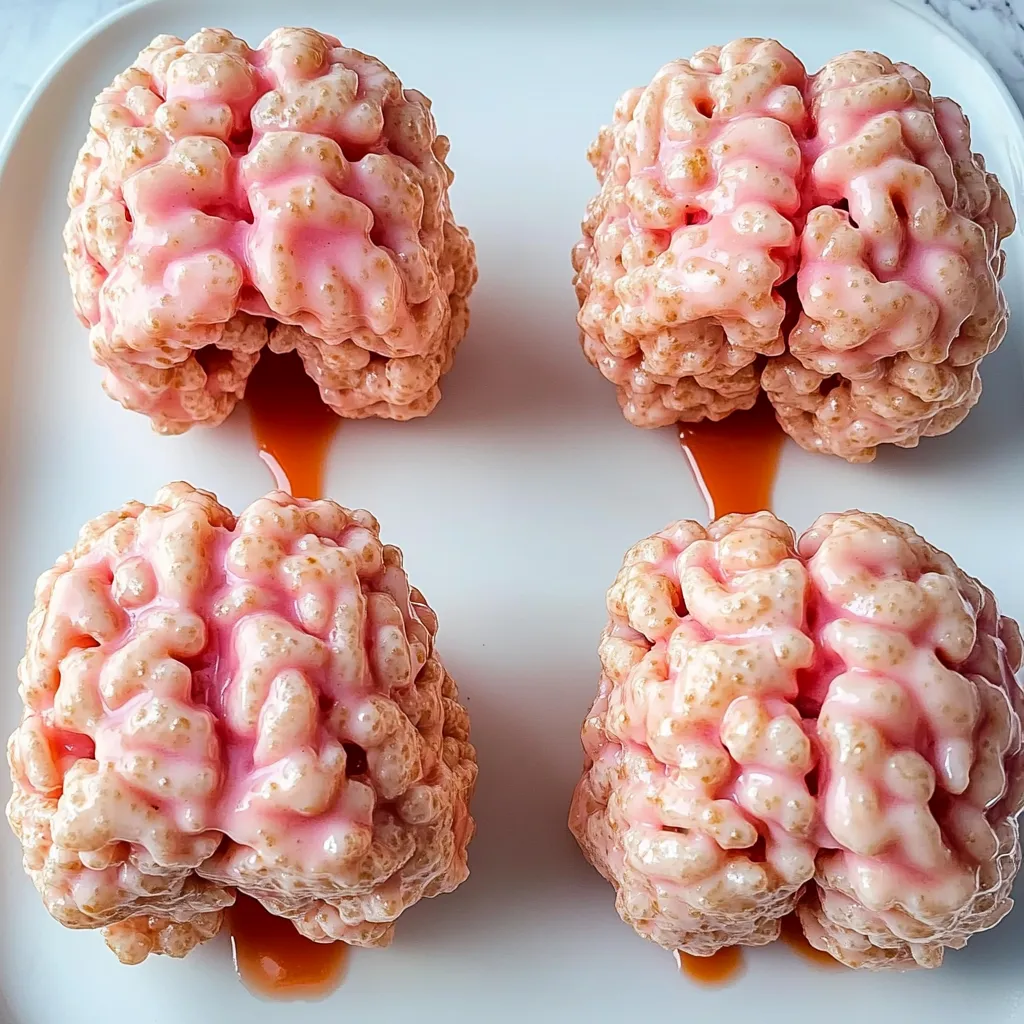
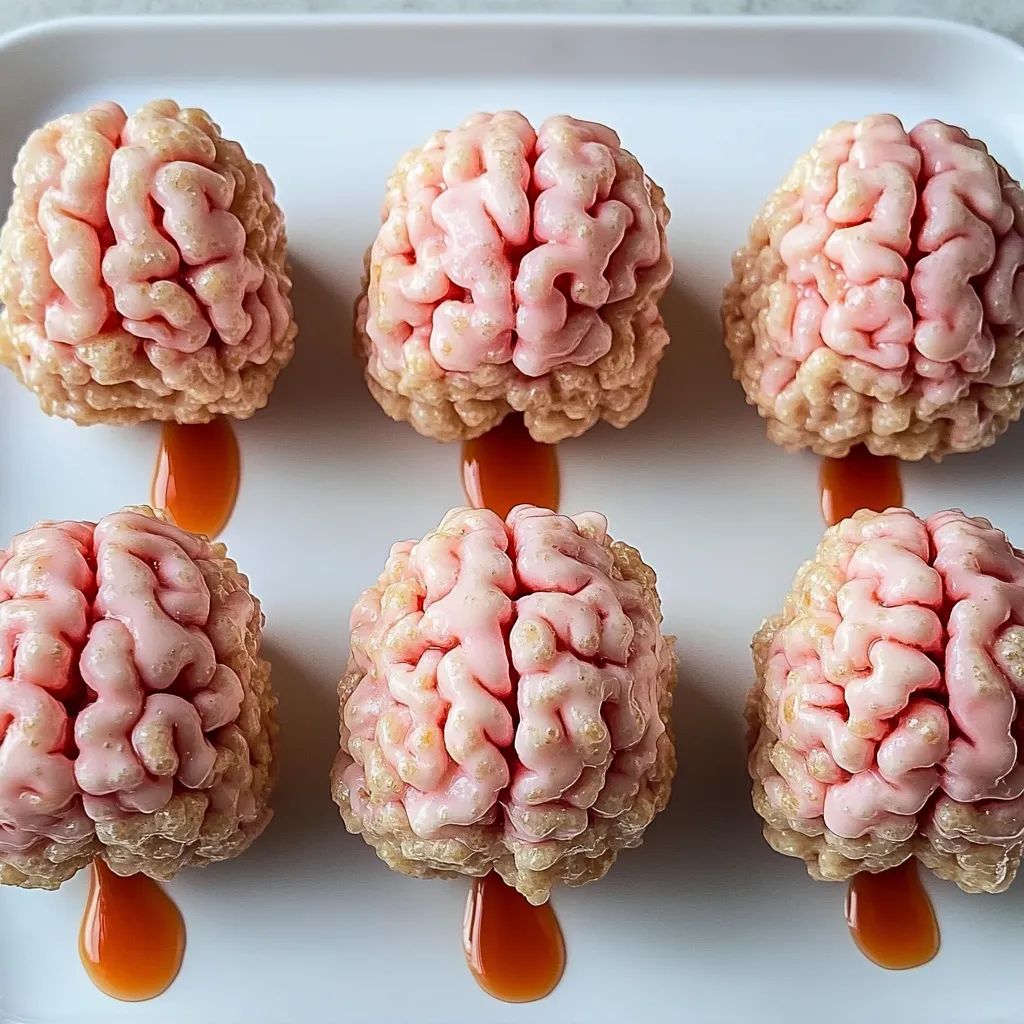
- Once the butter is melted, add in the mini marshmallows. Stir continuously until they’re completely melted and smooth. This is where you can sprinkle in your food coloring. For that brain-like hue, think soft pink or even a deep red! Blend it in until the color is just right.
- Remove the pot from the heat and quickly stir in the vanilla extract. That vanilla smell will really steal the show!
- Add the Rice Krispies to the marshmallow mixture in small batches. Gently fold the cereal into the gooey marshmallow river, being careful not to crush the cereal. You want all those crispy bits to stay nice and crunchy!
- Once everything is mixed together, transfer the mixture onto the greased baking sheet. Use your hands (perhaps a bit greased too) to shape the mixture into brain shapes. Don’t worry about making them perfect—quirky shapes add character!
- Now comes the fun part! While the mixture is still warm and sticky, press some gummy worms or other spooky candies into your brain shapes. Let your creativity flow! Maybe some worms are crawling out… how spooky!
After shaping, let the treats cool completely for about 30 minutes. Once they’re set, you can dust them lightly with powdered sugar for an eerie fog effect. And voila—your Marshmallow Rice Krispies Halloween Brains are ready to impress!
Pro Tips & Variations
Want to make your Halloween Brains even more fun? Here are some playful twists and tips:
- Add a dash of flavored extract, like almond or coconut, to give your treats a unique taste!
- For a healthier spin, swap out 2 cups of Rice Krispies with puffed quinoa or a gluten-free cereal.
- Using different food colorings can change up the mood dramatically—think green for zombie brains or black for a more gothic look!
- If you’re feeling crafty, use melted chocolate to create “veins” on your brain shapes. Just let the chocolate cool slightly before drizzling it on!
Serving Suggestions
These fun treats are perfect for serving at Halloween parties, but they can also be wonderful as a sweet surprise in your kiddo’s lunchboxes! Pair them with a glass of cold apple cider or warm spiced tea for an autumnal snack that brings everyone together. You can also arrange them on a platter with other spooky-themed snacks like ghost-shaped cookies or pumpkin cupcakes. Just imagine the smiles around your table!

Storage Tips
Leftovers? No problem! To keep your Marshmallow Rice Krispies Halloween Brains fresh, store them in an airtight container at room temperature. They’ll stay good for about a week. You can also seal them in plastic wrap and pop them in the fridge. If you want to keep them longer, freeze them in a single layer on a baking sheet, then transfer them to a freezer-safe bag once solid. Just thaw them at room temperature when you’re ready to enjoy them again.
FAQs
Can I use regular marshmallows instead of mini ones?
Absolutely! Regular marshmallows work just fine; just chop them up a bit before melting for easier mixing!
Can I make these ahead of time?
For sure! You can make these up to a few days in advance. Just keep them stored in an airtight container to keep them from getting too hard.
How do I prevent them from sticking together?
Greasing your hands and your mixing bowl really helps! Additionally, you can dust the finished treats with powdered sugar to prevent them from sticking.
Can I use a different cereal?
Of course! Feel free to use any puffed cereal you like. Just ensure it has a similar texture to Rice Krispies, so the final product holds together well.
Conclusion
And there you have it—your very own Marshmallow Rice Krispies Halloween Brains! This recipe is not only a fun activity to share with family and friends, but it also brings back those sweet memories of Halloween excitement. I would love to hear how yours turn out! Feel free to drop a comment below or share your spooktacular creations. Happy Halloween baking!
Leave a Comment