

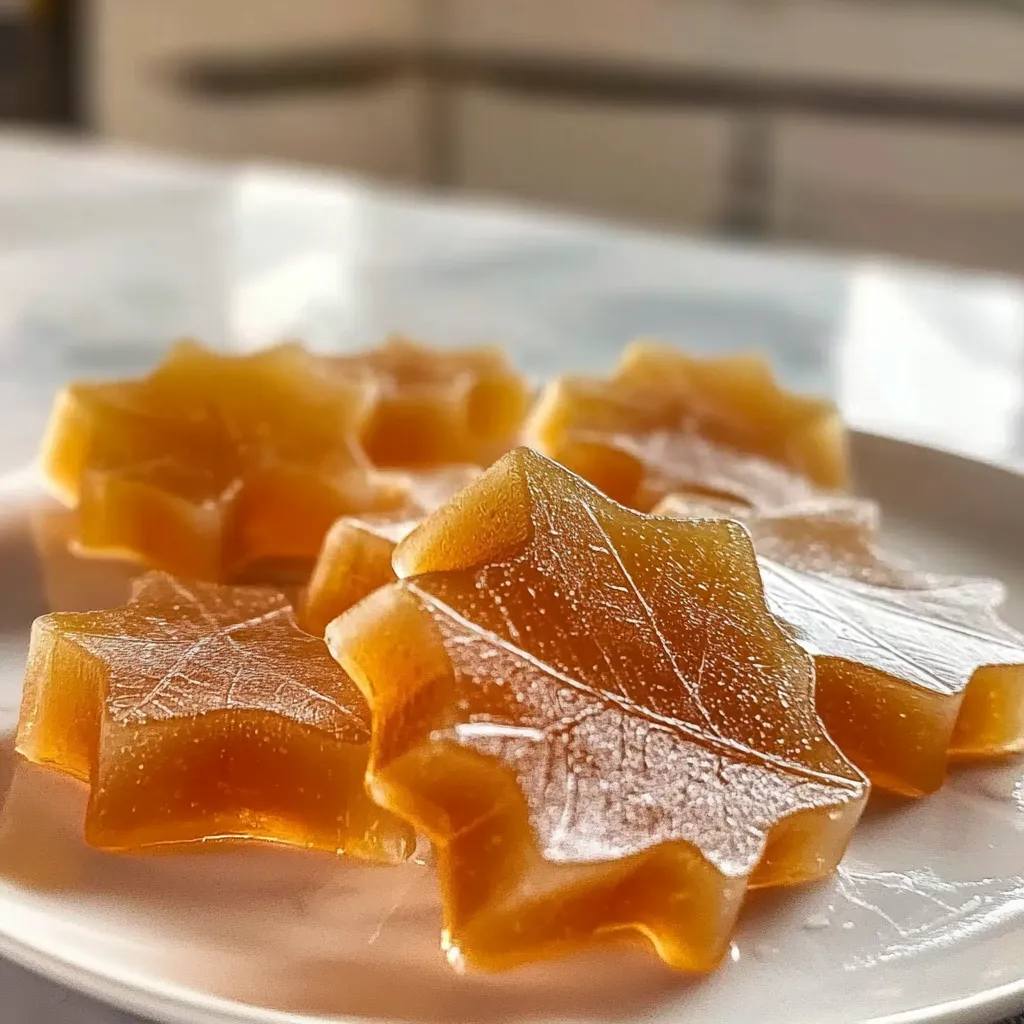
Oh, the sweet whisper of maple syrup—it conjures up memories of chilly mornings, cozy breakfasts, and lazy weekends spent savoring the simple joys of life. Growing up, nothing felt quite as special as sitting at the kitchen table with a warm stack of pancakes, a generous pour of syrup glistening on top, and that irresistible smell wafting through the air. But as delightful as maple syrup is, my love for its sugary sister—Homemade Maple Syrup Candy—runs even deeper. There’s something magical about transforming liquid gold into a chewy, melt-in-your-mouth treat. It’s pure nostalgia for me, and I can’t wait to share this delightful recipe with you! Get ready to take a sweet journey that’ll bring a smile to your face, all while filling your kitchen with that heavenly maple aroma.
Why You’ll Love This Recipe
- Easy to Make: With just a few simple ingredients, you’ll have delicious candy ready to impress family and friends.
- Perfect Winter Treat: This is a wonderful project for snowy days. Gather the family and create memories while cooking!
- Natural Sweetness: Using real maple syrup means you’re enjoying a treat that’s both tasty and naturally sweet.
- Customizable: Add nuts, chocolate, or spices to make this candy your own!
Ingredients
Here’s what you’ll need to whip up this delightful candy:
- 2 cups pure maple syrup (not imitation—trust me, the taste matters!)
- ¼ cup unsalted butter
- ½ teaspoon salt
- 1 teaspoon vanilla extract
- Optional: ½ cup chopped nuts (like pecans or walnuts) or chocolate chips for extra flavor!
Note: Using pure maple syrup adds depth and flavor to your candy that artificial syrups just can’t compete with.

Step-by-Step Instructions
Alright, friends! Let’s get those candy-making skills polished up. Here’s how we do it:
- Prep your pan: Line a baking dish or a tray with parchment paper. This will help prevent sticking and make it easier to lift out the candy later. You can also grease it lightly with butter for extra insurance.
- Combine ingredients: In a medium-sized saucepan, combine the maple syrup, butter, and salt. Stir gently and bring the mixture to a boil over medium heat. It’s crucial to stir intermittently to prevent the syrup from burning.
- Watch the temperature: Using a candy thermometer, let the mixture boil until it reaches the soft-ball stage, which is about 234°F (112°C). This may take around 10-15 minutes, so be patient! Meanwhile, enjoy the sweet smell filling your kitchen.
- Cool and stir: Once it reaches the right temperature, remove it from the heat and let it cool for about 5 minutes. Then, stir it vigorously for about 5 minutes. The mixture will start to thicken and lose its gloss—this is when the magic happens!
- Optional add-ins: If you want to add nuts or chocolate, now’s the time! Just fold them into the mixture gently.
- Pour into the pan: Pour the thickened mixture into your prepared pan or tray, spreading it evenly with a spatula. Be careful; it’s hot! Allow it to cool completely at room temperature.
- Cut and enjoy: Once it’s cooled and set (about 1-2 hours), lift it from the pan using the parchment paper and cut it into bite-sized pieces. Enjoy your homemade maple syrup candy with family and friends!
Tip: If you want that perfect texture, resist the urge to rush the cooling process. It’s all about patience here!
Pro Tips & Variations
Let’s have a bit of fun with this recipe! Here are some playful ideas to get those creative juices flowing:
- Spicy Maple Twist: Add a pinch of cayenne pepper for a sweet and spicy kick!
- Nutty Delight: Toss in some roasted almond slices or pecans for a delightful crunch.
- Chocolate Lovers: Fold in mini chocolate chips for unexpected bursts of sweetness in every bite.
- Coconut Vibe: Sprinkle in some unsweetened shredded coconut for a tropical twist.
These variations can elevate your candy-making adventure, ensuring you create a treat that reflects your personal taste!
Serving Suggestions
How do I love to serve this candy? Let me count the ways! While it’s absolutely delightful straight from the pan, here are some cozy serving ideas:
- Gift it: Package pieces in cute little bags or boxes tied with a ribbon for an incredibly thoughtful gift that showcases your culinary talent.
- Snack time: Enjoy it as a sweet treat on its own with a cup of hot coffee or tea—perfect anytime you need a little pick-me-up.
- Breakfast addition: Crumble some on top of yogurt or oatmeal for a unique breakfast treat.
- Ice cream topping: Warm a few pieces and drizzle them over vanilla ice cream for a decadent dessert!
Storage Tips
Wondering how to make your maple syrup candy last? Here are some easy storage instructions:
- Refrigerate: Store any leftover candy in an airtight container in the fridge. It should stay fresh for about a week.
- Freeze: You can also freeze maple syrup candy! Just cut it into pieces and place it in a freezer-friendly container or bag. It lasts up to three months. When you’re ready to enjoy, allow it to thaw at room temperature.
- Reheat delicately: If you choose to warm it up, do so in short intervals in the microwave to avoid melting it into a gooey mess.
FAQs
Can I use imitation maple syrup?
While you can use imitation syrup, I highly recommend sticking with pure maple syrup. The flavor is vastly superior and will make a huge difference in the final product. Trust me, you won’t regret it!
What if I don’t have a candy thermometer?
No worries! If you don’t have a candy thermometer, you can still make this candy. Just drop a small amount of the syrup mixture into a glass of cold water. If it forms a soft ball that you can squish between your fingers, you’re ready to go!
Can I make this vegan?
Absolutely! You can substitute the unsalted butter with coconut oil or a vegan butter alternative. Just ensure that your maple syrup is entirely pure and free from any additives.
What’s the best way to prevent sticking?
Using parchment paper is your best friend here! It keeps the candy from sticking to the pan, making it easy to lift out. You can also give it a light greasing with some butter for an extra layer of non-stickiness.
How should I cut the pieces?
It’s best to give the candy a bit of time to set before cutting. Use a sharp knife and apply gentle pressure to avoid breaking the pieces. You can cut them into squares, rectangles, or even fun shapes using cookie cutters!
Conclusion
And there you have it, my sweet friends—a simple yet delightful recipe for Homemade Maple Syrup Candy that’s sure to become a cherished treat in your home. Whether you’re making it for a cozy family evening, to gift a friend, or just to indulge your sweet tooth, this candy is sure to bring smiles all around. Don’t forget to share your candy-making experiences with me in the comments! I adore hearing how you put your own spin on recipes, and please let me know if you’ve tried any of the fun variations. Happy cooking and sweet candy-making!

Leave a Comment