

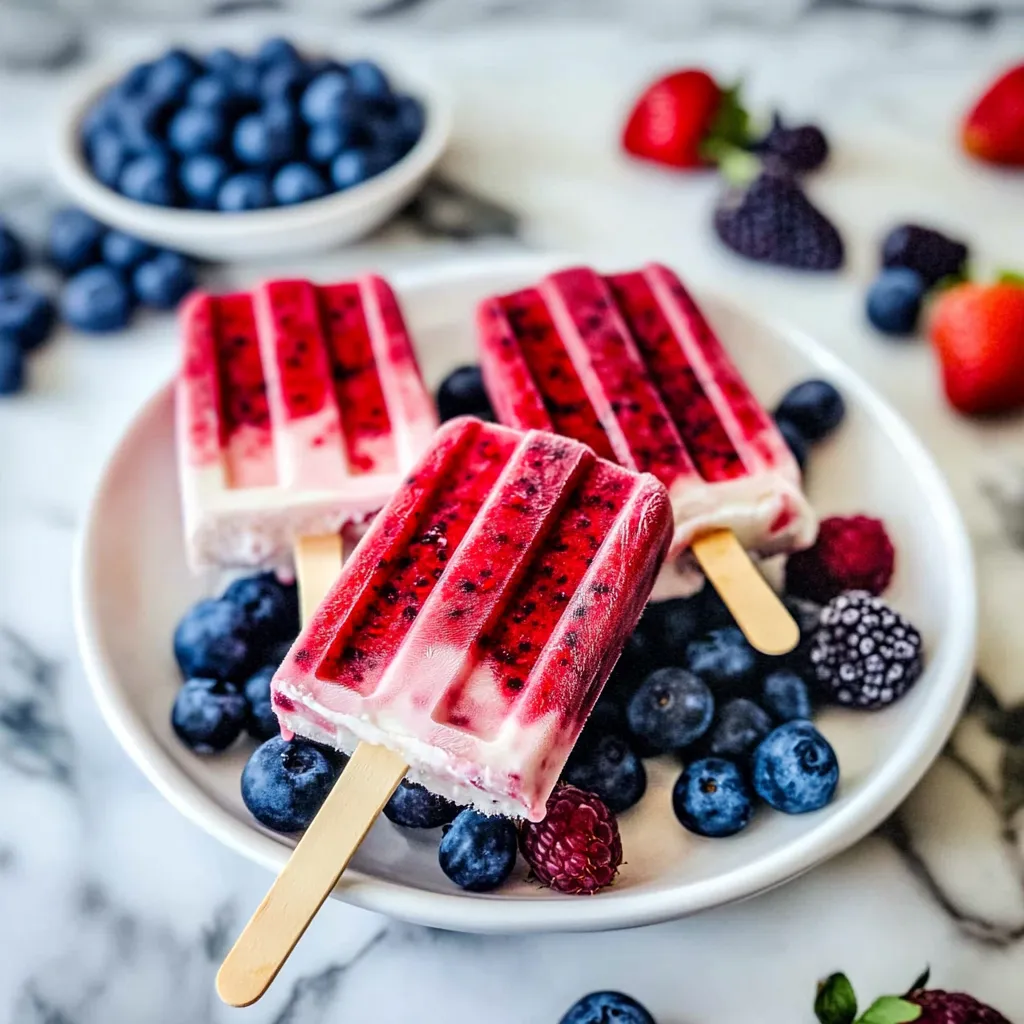
There’s nothing quite like a refreshing treat on a hot summer day, and Homemade Berry Popsicles – 4th of July Recipe are the perfect star-spangled addition to your holiday festivities! Bursting with vibrant flavors and made using fresh, juicy berries, these popsicles not only keep you cool but also bring a splash of color to your celebration. The beauty of this recipe lies in its versatility; you can swap in your favorite seasonal fruits or even mix in a hint of yogurt for an extra creamy texture. Experiment with different combinations—think strawberry-blueberry or raspberry-peach—for a truly personalized pop!
To achieve that perfect popsicle consistency, make sure to blend the ingredients thoroughly before pouring them into molds. For added fun, toss in some whole berries for a delightful surprise in every bite. Whether you’re serving them at a backyard barbecue or enjoying them poolside, these homemade treats are bound to be a crowd-pleaser. Let’s dive into this exciting recipe that’s sure to make your 4th of July unforgettable!
Ingredients for Homemade Berry Popsicles – 4th of July Recipe:
To create vibrant and flavorful Homemade Berry Popsicles perfect for your Independence Day celebrations, you’ll need a delightful mix of fresh berries, natural sweeteners, and creamy elements. This recipe serves about 8 to 10 popsicles, making it ideal for gatherings. Below is a detailed list of ingredients:
Fruits
- 1 cup strawberries, hulled and halved
- 1 cup blueberries, fresh or frozen
- 1 cup raspberries, fresh or frozen
- 1 cup blackberries, fresh or frozen
Liquid Mix
- 2 cups coconut water, for a refreshing taste
- 1 cup fresh orange juice, preferably from freshly squeezed oranges for optimum sweetness
- ½ cup honey or maple syrup (adjust to taste), to enhance sweetness without overpowering the berry flavors
Additional Ingredients
- 1 teaspoon pure vanilla extract, to elevate the overall flavor profile
- ⅛ teaspoon sea salt, to balance the sweetness just right
For Presentation
- Fresh mint leaves, optional, for garnish when serving
- Thinly sliced fruits, such as oranges or lemons, for a layered effect (optional)
Possible Variations
If you’re looking to switch things up or cater to different taste preferences, consider these options:
- Swap out the coconut water for almond milk or even yogurt for a creamier texture.
- Add a tablespoon of freshly squeezed lemon or lime juice for a zesty kick.
- Incorporate herbs like basil or rosemary for an aromatic twist.
- Use flavored sparkling water instead of still water to add some effervescence!
These ingredients come together to make not just a visually appealing dessert but also a wholesome treat packed with vitamins and antioxidants. Feel free to experiment with different berries and liquids to find the perfect balance for your taste buds!
How to prepare Homemade Berry Popsicles – 4th of July Recipe:
Making delicious homemade berry popsicles is a fun and easy way to celebrate the 4th of July. Follow these steps to create refreshing treats that are perfect for hot summer days.
Gather Your Ingredients
Start by collecting all required ingredients. You will need:
- 2 cups of mixed berries (strawberries, blueberries, raspberries)
- 1 cup of yogurt or a non-dairy alternative
- 1 tablespoon of honey or agave syrup (optional)
- Juice of 1 lemon
Prepare the Berries
Wash the mixed berries thoroughly under cold running water. Remove any stems, leaves, or bruised parts. Dry them gently using a paper towel or a clean cloth.
Blend the Mixed Ingredients
Place the washed berries in a blender. Add the yogurt, honey or agave syrup, and the lemon juice to the blender. If you prefer a fruitier taste, adjust the sweetener to your liking.
Blend Until Smooth
Secure the lid on the blender and blend the mixture on medium speed until it reaches a smooth consistency. Scrape down the sides if necessary to ensure all berries are blended well. You want a creamy texture with no lumps.
Taste and Adjust Sweetness
After blending, taste the mixture. If it needs extra sweetness, add more honey or agave syrup. Blend again briefly to combine. Adjust the flavors based on personal preference.
Prepare Your Popsicle Molds
Grab your popsicle molds and make sure they are clean and dry. If you have reusable molds, ensure they are ready for filling.
Fill the Molds with Mixture
Pour the blended berry mixture evenly into each popsicle mold. Leave a small gap at the top for expansion as they freeze. Ensure each mold is filled sufficiently for a solid popsicle.
Insert Sticks and Freeze
Place the popsicle sticks into the center of each mold. Make sure they stand upright. Carefully transfer the filled molds to the freezer.
Freeze for Several Hours
Allow the popsicles to freeze for at least 4 to 6 hours, or until they are completely solid. For best results, freeze overnight.
Remove and Enjoy
Once fully frozen, remove the popsicles from the molds. Run warm water over the outside of the molds for a few seconds if needed. Enjoy your homemade berry popsicles and have a wonderful 4th of July!
Tips for the Perfect Homemade Berry Popsicles – 4th of July Recipe
Use Quality Ingredients
Start with fresh, ripe berries. Strawberries, blueberries, raspberries, and blackberries all work beautifully. Local, organic fruits often have better flavor and nutrients. If fresh berries are not in season, consider using frozen ones. Just ensure they are free from added sugars and preservatives. The quality of your ingredients significantly impacts the flavor of your popsicles.
Maintain the Correct Temperature
Freezing popsicles at the right temperature is crucial. Set your freezer to a stable 0°F (-18°C) to ensure even freezing. After blending your berry mixture, pour it into molds and place them in the freezer immediately. If your freezer isn’t cold enough, the pops can take longer to freeze or become icy and lose their smooth texture.
Perfect Sweetness Adjustments
Taste your berry mixture before pouring it into molds. Depending on your fruit’s natural sweetness, you might want to add a bit of honey, maple syrup, or agave nectar for extra sweetness. For a healthier option, consider using stevia or erythritol as sugar substitutes. Adjust to your preference while keeping in mind that popsicles taste less sweet when frozen.
Substitutions for Dietary Restrictions
If you need to cater to specific dietary needs, here are some easy swaps. For a vegan version, use coconut water or almond milk instead of yogurt. If you’re avoiding sugar, experiment with sugar alternatives like monk fruit sweetener. Additionally, if you have nut allergies, use oat milk or hemp milk in place of any nut-based products.
Layering Flavors and Colors
For a festive 4th of July treat, consider layering different fruit purees. Blend strawberries for a red layer, blueberries for a blue layer, and banana or coconut for white. Pour each layer into the molds and freeze briefly before adding the next layer. This not only creates a striking visual but also combines different flavors for a delightful surprise with every bite.
Easy Release from Molds
To effortlessly remove your popsicles from the molds, run warm water over the outside for a few seconds before pulling them out. This gentle warmth helps loosen the pops without damaging their shape.
By following these tips, you will create a delightful batch of homemade berry popsicles that everyone will enjoy during your 4th of July celebrations!
Storage Tips for Homemade Berry Popsicles – 4th of July Recipe:
Storing your homemade berry popsicles correctly ensures they maintain their freshness and fruity flavor. Follow these easy guidelines for optimal storage.
Maintain Freshness
To keep your popsicles fresh, always use airtight containers or zip-top freezer bags. Remove as much air as possible from the bags before sealing. This action prevents freezer burn and helps maintain the popsicle’s taste and texture.
Optimal Storage Conditions
Store your popsicles in the coldest part of your freezer, typically towards the back. This area stays consistently cold, reducing the risk of melting and refreezing. Avoid storing popsicles in the freezer door, where temperatures fluctuate when the door opens.
Shelf Life of Homemade Popsicles
Your berry popsicles can last up to 2 months in the freezer if stored correctly. However, for the best flavor and texture, try to consume them within 1 month. After this period, the quality may decline, resulting in a less enjoyable treat.
Labeling for Organization
Label your containers or bags with the date of preparation. This method helps you keep track of how long your popsicles have been stored. Use a permanent marker for the best results, ensuring the information remains clear even in the freezer.
Thawing Popsicles
When you’re ready to enjoy your popsicles, remove them from the freezer. Never try to microwave them, as this can lead to uneven melting. Instead, allow the popsicles to sit at room temperature for a few minutes to soften, making it easier to remove them from their molds.
Tips for Reusing Leftover Ingredients
If you have leftover berry puree or other ingredients, consider making a small batch of popsicles to enjoy later. Store any excess ingredients in the fridge for up to 5 days or freeze them for longer storage. You can incorporate these into smoothies or other treats.
Implement these storage tips for your homemade berry popsicles, ensuring crisp flavor and delightful enjoyment during your 4th of July celebrations. Proper storage not only enhances your experience but also encourages your culinary creativity!
Related Recipes to Homemade Berry Popsicles – 4th of July Recipe
If you loved making Homemade Berry Popsicles for the 4th of July, you’ll enjoy these similar treats that are perfect for summer gatherings and add a fun twist to your celebrations.
- Fruit-Infused Water: This refreshing drink keeps you hydrated and cool. Simply combine your favorite fruits like lemon, cucumber, and mint in water. The infusion process mirrors the vibrant flavors in your popsicles while providing a light option that perfectly complements heavier meals.
- Frozen Yogurt Bark: For a healthy snack, spread Greek yogurt on a baking sheet and top it with fresh berries and nuts. Freeze and break into pieces for a delightful treat. This recipe mirrors the berry theme and offers a creamy texture that balances the fruity popsicles wonderfully.
- Summer Berry Salad: Combine mixed greens, strawberries, blueberries, and a light vinaigrette for a refreshing dish. This salad brings in the berry element and makes for a great side, pairing nicely with the freeze of your berry popsicles and providing a delightful contrast of flavors and temperatures.
- Homemade Lemonade: A classic summertime drink, lemonade pairs beautifully with sweets like popsicles. Adding fresh mint will enhance the flavor. Its tartness complements the sweetness of your popsicles, making for an enjoyable combination during outdoor festivities.
These recipes not only share similar ingredients but also capture the essence of summer fun, making them perfect companions to your tasty frozen dessert.
Frequently Asked Questions:
What ingredients are needed for these 4th of July berry popsicles?
To make delightful homemade berry popsicles perfect for your July 4th celebration, you will require fresh berries such as strawberries, blueberries, and raspberries. Additionally, you’ll need natural sweeteners like honey or agave syrup, and a liquid base, which can be fruit juice or yogurt. Using fresh, organic ingredients elevates the flavors and ensures a healthier treat for everyone to enjoy.
Can I use frozen berries for my berry popsicles?
Absolutely! While fresh berries are preferred for their vibrant flavor and texture, frozen berries can be a convenient alternative, especially when fresh ones are out of season. Just remember to thaw them slightly before blending for a smoother mix. The texture might differ slightly, but they will still create a delicious frozen treat.
How long does it take to freeze berry popsicles?
Typically, your festive berry treats will need around 4 to 6 hours to fully freeze. However, if you prefer to serve them later, you can keep them in the freezer for an extended period. Just ensure they are well wrapped or stored in a sealed container to prevent freezer burn.
Can I customize the flavor of my berry popsicles?
Certainly! One of the best aspects of making berry popsicles at home is the ability to tailor the flavors to your liking. You can experiment with different combinations of berries, add herbs like mint or basil, or even introduce a splash of citrus juice like lemon or lime to enhance the taste profile.
Are these berry popsicles healthy?
Yes, homemade berry popsicles are a nutritious dessert option, especially compared to traditional store-bought varieties, which often contain artificial flavors and high sugar levels. By controlling the ingredients and opting for natural sweeteners, you can create a refreshing and guilt-free frozen delight that’s perfect for hot summer days.
How should I store leftover berry popsicles?
If you have any leftover homemade berry popsicles after the festivities, you can store them in the freezer. It is best to wrap each popsicle individually in plastic wrap or place them in an airtight freezer-safe container. This will help maintain their flavor and texture while preventing them from sticking together.
Conclusion:
In summary, these Homemade Berry Popsicles – 4th of July Recipe are the perfect way to celebrate summer while enjoying a refreshing treat. Their simplicity makes them accessible for cooks of all skill levels, allowing anyone to whip up a batch in no time. Plus, the flexibility of the recipe means you can easily swap in your favorite berries or even mix in yogurt or coconut milk for a creamier texture. Experimenting with sweetness and flavor combinations gives you endless customization options to suit your palate and impress your guests. Whether you’re hosting a festive barbecue or enjoying a lazy afternoon, these popsicles are a delightful addition to your 4th of July festivities. Embrace the creativity and celebrate with wholesome, homemade goodness that everyone can enjoy!
[tasty-recipe id=”2653″]

Leave a Comment