

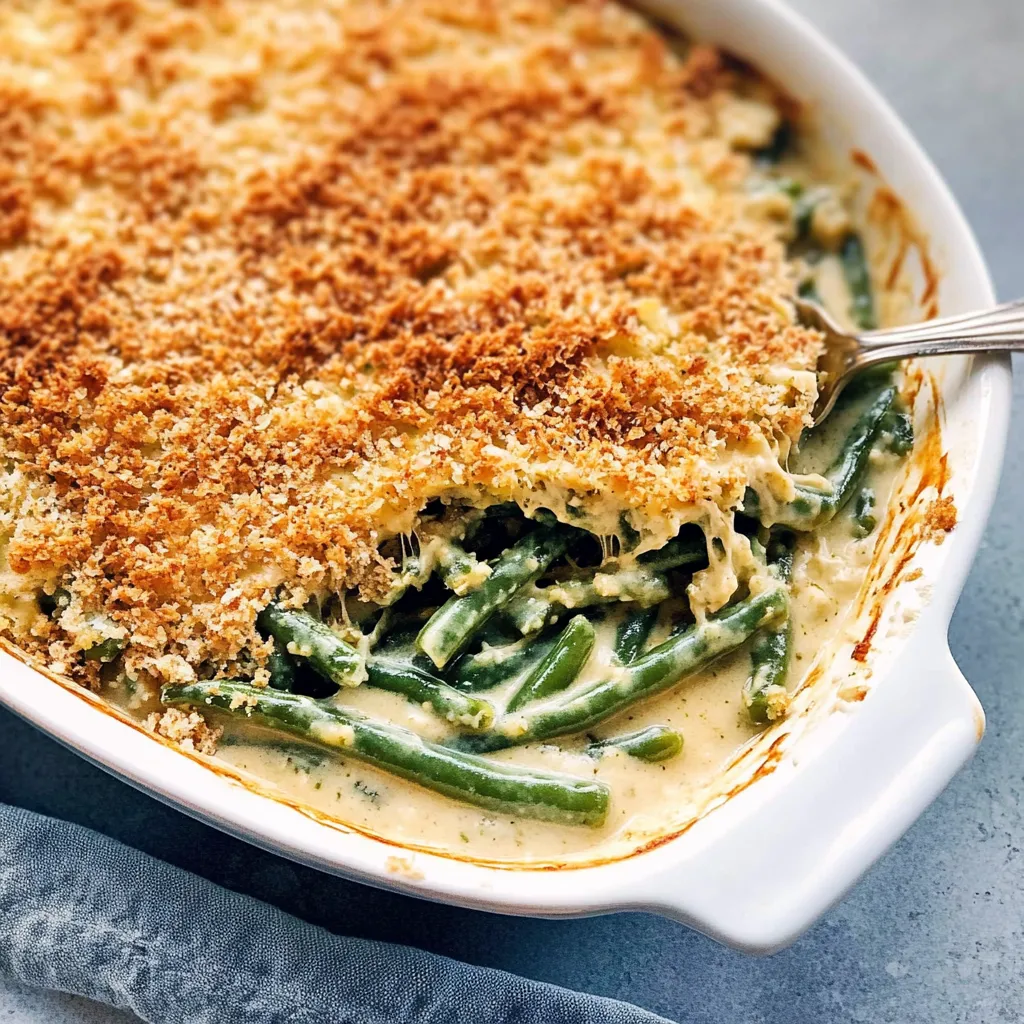
Ah, the heartwarming aroma of green bean casserole wafting through the kitchen is like wrapping up in a cozy blanket! Growing up, my family made this dish every Thanksgiving, and it was always a highlight amidst the turkey and mashed potatoes. I can still see my mom carefully layering those green beans and hearing the satisfying crunch of crispy onions on top as we dug into our plates. It’s a dish that brings back memories, laughter, and the warmth of being surrounded by loved ones. Today, I want to share my beloved Green Bean Casserole recipe with you. It’s not just a holiday dish—it’s perfect year-round for family dinners or a cozy weeknight treat!
Why You’ll Love This Recipe
- Quick and easy to prepare, perfect for busy weeknights!
- Budget-friendly ingredients that pack a flavorful punch.
- Rich, creamy texture combined with a satisfying crunch.
- Comfort food at its finest that everyone will love.
- Can be customized based on what you have on hand!
Ingredients
Let’s gather our ingredients! Here’s what you’ll need:
- 1 pound fresh green beans, trimmed and cut into 1-inch pieces (or 2 cans of green beans)
- 1 can (10.5 ounces) cream of mushroom soup – trust me, this is the heart of the recipe!
- ½ cup milk (whole or 2%, but heavy cream will make it even dreamier)
- 1 teaspoon soy sauce (adds that umami touch)
- ½ cup grated cheddar cheese (optional for extra cheesiness)
- 1 cup crispy fried onions (the crunch factor!)
- Salt and pepper to taste
Note: If you want a fresh burst of flavor, consider using fresh garlic instead of powdered garlic, or even sautéing some onions until they’re caramelized before adding them to the mix!
Step-by-Step Instructions
Ready to get cooking? Let’s make this delicious Green Bean Casserole!
- Preheat your oven to 350°F (175°C). It’s crucial to get that oven nice and hot so our casserole bubbles and warms through beautifully!
- If you’re using fresh green beans, bring a pot of salted water to a boil. Blanch the green beans for about 3-4 minutes until they are a vibrant green and tender-crisp. If using canned beans, just drain and rinse them.
- In a large mixing bowl, combine the cream of mushroom soup, milk, and soy sauce. Stir until well mixed – this creamy base is what dreams are made of!
- Add in the blanched or canned green beans. Stir gently to coat them with the soup mixture. Be careful not to break them apart; you want those beautiful, intact green beans!
- Season generously with salt and pepper, and if you’re feeling cheesy, fold in that grated cheddar. Who doesn’t love a little extra flavor?
- Pour the mixture into a greased 1.5-quart baking dish. Spread it out evenly, and don’t forget the corners!
- Now for the best part: sprinkle the crispy fried onions on top. This will give your casserole that irresistible crunch and flavor contrast.
- Bake in the preheated oven for about 25-30 minutes, or until the casserole is bubbly and the onions are golden brown.
- Let it rest for a few minutes before serving—it’ll be hot, hot, hot!
Pro Tip: Avoid overmixing when adding the green beans to keep that perfect texture. No one wants mushy beans!
Pro Tips & Variations
The beauty of a Green Bean Casserole is how customizable it is! Here are some fun ideas to spice it up:
- Swap in different vegetables: You can add sautéed mushrooms, carrots, or even corn for an extra pop of color and flavor.
- Add some herbs: Fresh thyme or rosemary can elevate the dish. Just sprinkle a little on top before baking!
- Switch up the cheese: Instead of cheddar, try pepper jack for a kick, or go with gouda for a smoky aroma.
- For a gluten-free option, use gluten-free fried onions and mushroom soup.
- Want a gourmet twist? Top with homemade breadcrumbs mixed with olive oil and Parmesan cheese instead of fried onions for a delightful crunch!
Serving Suggestions
What’s more comforting than a generous serving of Green Bean Casserole? Here’s how I love to enjoy it:
- Pair it with a crusty loaf of bread for some extra texture and to soak up all the delicious creamy goodness!
- Serve it alongside roasted chicken or a juicy steak—the flavors meld wonderfully.
- A light garden salad on the side can brighten up the plate and balance out the richness of the casserole.
- And let’s not forget dessert! End your meal with a slice of pumpkin pie or apple crisp to truly indulge the senses!
Every bite will remind you of family gatherings and cozy evenings at home, wrapping you in warmth with every taste.
Storage Tips
Got leftovers? That’s a win in my book! Here’s how to store your Green Bean Casserole so it stays delicious:
- Refrigerating: Place leftover casserole in an airtight container in the fridge for up to 3 days.
- Freezing: For longer storage, freeze the casserole before baking. Just cover it well and it can last up to 2 months. When you’re ready to eat, bake it straight from the freezer, adding an extra 10-15 minutes to the cooking time.
- Reheating: To reheat, pop it in the oven at 350°F until warm. You might want to cover it with foil to keep the onions crisp while preventing over-browning.

FAQs
Can I make Green Bean Casserole ahead of time?
Absolutely! You can prepare the casserole a day in advance. Just assemble everything and cover it with foil in the refrigerator. Bake it when you’re ready, adding a few extra minutes to ensure it’s hot throughout.
Can I use frozen green beans instead of fresh?
Yes! Frozen green beans work great. Just make sure to thaw and drain them before mixing into the casserole.
What can I use instead of cream of mushroom soup?
If you’re not a fan of mushroom soup, you can use cream of chicken soup or a homemade white sauce as a substitute for a similar creamy texture.
Is this recipe suitable for vegetarian diets?
Indeed! Just ensure that the cream of mushroom soup and fried onions are vegetarian-friendly. You can even make a homemade mushroom sauce if you want to keep it wholesome!
Conclusion
And there you have it—a cozy, nostalgic Green Bean Casserole recipe that’s both easy and oh-so-delicious. I hope you whip this up and create your own warm memories around the dinner table. Don’t forget to share your thoughts or any twists you tried in the comments below. I can’t wait to hear how it turned out for you! Happy cooking!

Leave a Comment