
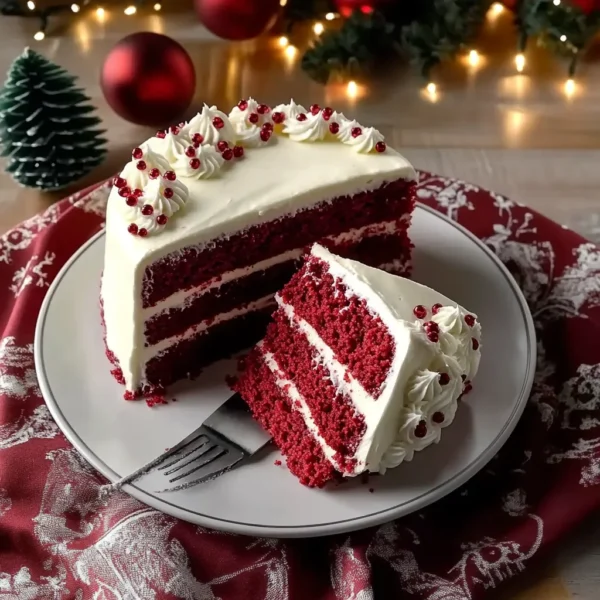
There’s something utterly magical about the holiday season, isn’t there? The scent of pine in the air, the twinkling lights, and most importantly, the fragrance of delicious baked goods wafting through the kitchen! One of my fondest memories from childhood is helping my grandmother bake her famous Red Velvet Cake as we prepared for our Christmas celebrations. She would giggle as I helped mix the vibrant red batter, and the joy of licking the bowl was always a highlight. Fast forward to today, and I’ve paired that cherished memory with my own twist to create this Festive Southern Red Velvet Christmas Cake.
This cake is not just a feast for the eyes with its rich red color and creamy white frosting – it’s a delightful combination of flavors that will have everyone in the spirit of the season. A slice of this cake captures the warmth of home, love, and holiday cheer, making it the perfect centerpiece for your festivities. Let’s dive in and whip up this beauty together!
Why You’ll Love This Recipe
- It’s super easy to make – perfect for both novice and experienced bakers!
- The lush, velvety texture will melt in your mouth, leaving you craving more.
- It’s a showstopper for holiday gatherings, bringing both flair and flavor to the table.
- Simple ingredients readily available at your local grocery store.
- It’s a fantastic way to bring the warmth and coziness of Southern baking into your home.
Ingredients
Gather these ingredients for your Festive Southern Red Velvet Christmas Cake:
- For the cake:
- 2 ½ cups all-purpose flour, sifted (sifting ensures a lighter cake)
- 1 ½ cups granulated sugar
- 1 teaspoon baking soda
- 1 teaspoon salt
- 1 teaspoon cocoa powder (this just adds a hint of flavor but won’t make it chocolatey)
- 1 ½ cups vegetable oil
- 1 cup buttermilk, room temperature (adds that lovely moist texture)
- 2 large eggs, at room temperature
- 2 tablespoons red food coloring (you can adjust based on how vibrant you like it)
- 1 teaspoon vanilla extract
- 1 teaspoon white vinegar (this helps with the rise and texture)
- For the cream cheese frosting:
- 1 ½ cups cream cheese, softened (for that irresistible creaminess)
- ½ cup unsalted butter, softened
- 4 cups powdered sugar, sifted (sifting gets rid of clumps)
- 1 teaspoon vanilla extract
Step-by-Step Instructions
Let’s get this delicious baking adventure started! Follow these simple steps carefully, and you’ll have a show-stopping cake in no time.
- Preheat your oven: Set it to 350°F (175°C). Get those ovens warming up!
- Prepare your pans: Grease and flour two 9-inch round cake pans. This will help the cakes release easily once baked.
- Mix the dry ingredients: In a large bowl, whisk together the flour, sugar, baking soda, salt, and cocoa powder until well combined. Don’t worry about lumps, just keep it light and fluffy!
- Combine wet ingredients: In another bowl, mix the oil, buttermilk, eggs, red food coloring, vanilla, and vinegar. Whisk until everything is smooth and blended.
- Bring it all together: Now, pour the wet mixture into the dry ingredients. Gently fold them together with a spatula until just combined. Remember, overmixing is a no-no! A few lumps are perfectly fine.
- Divide and pour: Split the batter evenly between the prepared cake pans. Shake them gently to even out the surfaces.
- Bake to perfection: Place the pans in the oven and bake for about 25-30 minutes. The cakes are ready when a toothpick inserted in the center comes out clean. The smell will be heavenly!
- Cool it down: Allow the cakes to cool in the pans for 10 minutes before turning them out onto wire racks. Let them cool completely before frosting.
- Prepare the frosting: In a large bowl, beat the softened cream cheese and butter together until smooth and creamy. Gradually add in the powdered sugar, mixing well after each addition. Finally, stir in the vanilla extract.
- Frost the cakes: Place one cake layer on a plate and spread a lovely layer of frosting on top. Top with the second layer and cover the top and sides with more frosting. Don’t worry about being perfect; a rustic finish is as charming as a flawless one!
- Decorate: If you’re feeling festive, consider garnishing your cake with festive sprinkles or crushed pecans on top for that extra holiday flair!

Pro Tips & Variations
Now, let’s chat about some fun twists and tips for your cake! The beauty of baking is that you can customize it to your liking.
- Spices: Add a pinch of cinnamon or nutmeg to the dry ingredients for a warm, cozy flavor that’s perfect for Christmas.
- Toppings: Crushed peppermint candies add a lovely crunch and a festive touch. You could also add chocolate shavings or even coconut for a tropical twist!
- Diet swaps: For a gluten-free version, you can substitute the all-purpose flour with gluten-free flour blend. Just keep an eye on the texture! If you’re vegan, you can find egg replacers and use coconut cream instead of butter for the frosting.
Serving Suggestions
Now that your cake is ready and looking fabulous, let’s talk about serving it! This cake is divine served at room temperature, but you can always pop it in the fridge for a little chill before serving to make those frosting flavors extra refreshing. I love serving it with a cup of hot cocoa or a comforting chai latte — the spices complement the cake beautifully.
If you’re hosting a holiday gathering, consider pairing it with some sparkling cider or a festive punch. For an elegant touch, slice it into generous pieces and place it on a beautiful cake stand. A sprinkle of powdered sugar or some fresh mint leaves on top can elevate its charm. Your guests will swoon!
Storage Tips
To keep your cake fresh and delicious for days (if it lasts that long!), here are some handy tips:
- Refrigeration: Store the cake in an airtight container in the refrigerator for up to a week. Just let it come to room temperature before serving for the best flavor!
- Freezing: If you want to prepare ahead, you can freeze the cake. Wrap each layer tightly in plastic wrap and aluminum foil, and it can stay in the freezer for up to three months. Just thaw in the refrigerator overnight before frosting and serving!
- Reheating: While you usually won’t need to reheat a cake, if you’d like it warm, pop a slice in the microwave for about 10-15 seconds for a cozy treat!
FAQs
Can I make this cake ahead of time?
Absolutely! You can bake the layers in advance and store them in the fridge or freezer. Just make sure they’re well-wrapped to prevent drying out. Then, frost and decorate before serving!
What if I don’t have buttermilk?
No worries! You can make a quick substitution by mixing one cup of milk with one tablespoon of vinegar or lemon juice. Let it sit for about 5 minutes to curdle slightly, and voilà! You’ve got homemade buttermilk.
Why is my cake not as red as I expected?
The intensity of the red color can be affected by the type of food coloring used. If you’re looking for an even bolder hue, feel free to add a little more food coloring until you reach the desired color. Just remember to mix carefully!
How do I ensure my cake is moist?
Using room temperature ingredients—eggs, buttermilk, and even your butter—helps create a smooth batter that blends nicely. Also, make sure you don’t overbake. Checking for doneness a few minutes early can help ensure a moist cake!
Conclusion
And there you have it! A stunning Festive Southern Red Velvet Christmas Cake that not only tastes incredible but also warms the heart. I hope this recipe brings you as much joy as it has to me and my family. I’d love to hear how yours turns out, so please leave a comment below or share your photos. Happy baking, and truly, may your holidays be as sweet as this delightful cake!
Leave a Comment