
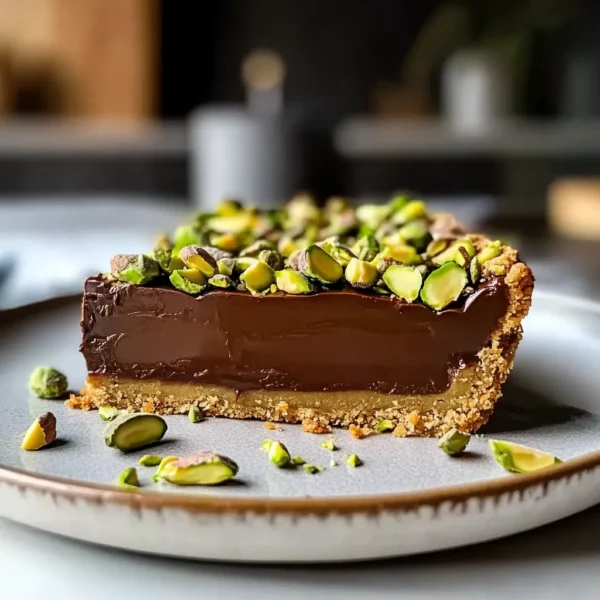
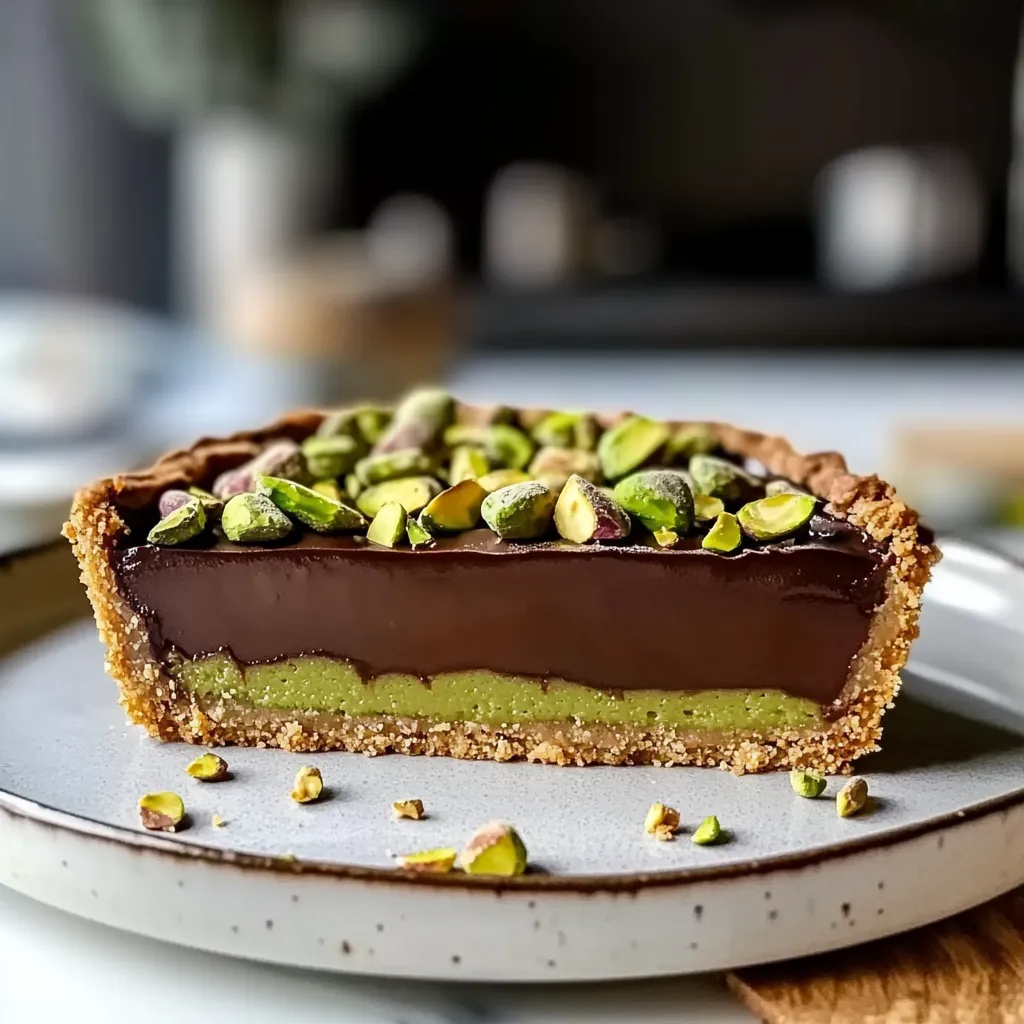
Do you remember the first time you tasted something so exquisite that it sent a shiver of delight down your spine? For me, it was at a quaint little bakery tucked in a bustling alley, filled with the irresistible aroma of fresh pastries and decadent desserts. Among their offerings was a beautiful Chocolate Pistachio Tar, and oh, let me tell you, it was love at first bite! The rich, velvety chocolate mingled with the earthy crunch of pistachios, creating a symphony of flavors that still dances in my mind. This dessert is an absolute showstopper, perfect for special occasions or just a cozy night in with loved ones. Let’s dive into how you can create this elegant treat yourself!
Why You’ll Love This Recipe
- Decadent flavors that elevate any gathering.
- Beautifully impressive without being overly complicated.
- Perfect balance of richness from chocolate and nuttiness from pistachios.
- It’s a fantastic make-ahead dessert—better when it sits for a bit!
Ingredients
Here’s what you’ll need to whip up this delightful Chocolate Pistachio Tar:
- 1 ½ cups all-purpose flour
- ½ cup unsweetened cocoa powder (don’t skimp on quality here!)
- 1 teaspoon salt
- ½ cup unsalted butter, softened
- ½ cup granulated sugar
- ¼ cup brown sugar, packed
- 2 large eggs
- 1 teaspoon vanilla extract
- 1 cup dark chocolate chips (70% cocoa works great)
- ½ cup pistachios, chopped (plus extra for garnish)
- ¼ cup heavy cream
- Powdered sugar for dusting (optional but recommended!)
Note: Always use high-quality chocolate; it’s the star of the show!
Step-by-Step Instructions
Ready to create this gorgeous masterpiece? Let’s get started:
- Preheat your oven: Preheat your oven to 350°F (175°C). This step is crucial for an even bake.
- Prepare the tart crust: In a mixing bowl, whisk together the flour, cocoa powder, and salt. Set aside.
- Cream the butter and sugars: In a separate bowl, beat together the softened butter, granulated sugar, and brown sugar until light and fluffy. This should take about 2-3 minutes.
- Add the eggs and vanilla: Beat in the eggs one at a time, followed by the vanilla. Mix until well combined.
- Combine wet and dry ingredients: Gradually add the flour mixture to the butter mixture, mixing just until combined. Don’t overmix—this will keep your tart crust wonderfully tender!
- Press dough into tart pan: Lightly grease a tart pan. Press the dough evenly into the bottom and up the sides. Use a fork to prick the bottom of the crust to prevent bubbling.
- Bake the crust: Bake the crust for about 10-12 minutes, until it’s slightly set but still soft. It will firm up as it cools.
- Create the chocolate filling: While the crust is baking, heat the heavy cream in a small saucepan over medium heat. Once it’s hot, remove it from the heat and add the dark chocolate chips. Let it sit for a minute, then stir until smooth and glossy.
- Add pistachios: Fold in the chopped pistachios into the chocolate mixture until they’re evenly distributed.
- Fill the tart: Once the crust is out of the oven and has cooled for a few minutes, pour the chocolate pistachio mixture into the tart crust. Use a spatula to spread it evenly.
- Chill: Allow the tart to cool to room temperature, then transfer it to the refrigerator for at least 2 hours (ideally overnight) to set.
- Serve: Before serving, sprinkle with extra chopped pistachios and a dusting of powdered sugar for a touch of elegance.
Pro Tips & Variations
Want to put a fun twist on this recipe? Here are some ideas:
- Nutty Alternatives: Try using almonds or hazelnuts instead of pistachios for a different flavor profile.
- Spicy Kick: A pinch of cayenne or chili powder in the chocolate filling adds an exciting warmth.
- Vegan Version: Substitute the butter with coconut oil and the eggs with flax eggs (1 tablespoon of flaxseed meal mixed with 2.5 tablespoons of water for each egg).
- Flavor Enhancements: A splash of espresso or coffee in the chocolate filling can intensify the chocolate flavor, making it richer!
Serving Suggestions
This Chocolate Pistachio Tar is so versatile! I love serving it with a dollop of freshly whipped cream and a side of seasonal berries for that pop of color. It pairs beautifully with a strong cup of coffee or a glass of dessert wine. For a more festive touch, consider drizzling a bit of caramel sauce over the top or serving it alongside a scoop of vanilla ice cream. Your guests will be swooning!

Storage Tips
Got leftovers? This tart keeps surprisingly well! Here are some tips:
- Refrigeration: Store any leftovers in an airtight container in the fridge for up to a week. The flavors meld beautifully over time.
- Freezing: You can freeze the tart before cutting for up to three months. Just be sure to wrap it tightly in plastic wrap and foil.
- Reheating: If you’re serving it again, just let it come to room temperature before serving. Avoid microwaving, as it can change the texture of the chocolate.
FAQs
Can I use white chocolate instead of dark chocolate?
Absolutely! Just be mindful that white chocolate is sweeter and creamier, so you might want to reduce the sugar just a bit to balance it out. It’ll give a lovely, different flavor!
Can I make this tart gluten-free?
Yes! Substitute the all-purpose flour with a gluten-free flour blend, and it should work just fine. I recommend a blend that contains a bit of almond flour or coconut flour for a nice texture.
How do I know when the tart is set properly?
The tart will look slightly firm to the touch, but the center should still have a gentle jiggle when you move it. If it’s too wobbly, it might need a little more chilling time in the fridge.
Can I add fruit to the filling?
Adding fruit can be delightful! Think raspberries or cherries—just make sure to reduce the amount of sugar slightly if you do, as the fruit can add natural sweetness.
Conclusion
And there you have it—your very own Chocolate Pistachio Tar, elegantly crafted and oh-so-delicious! I hope you enjoy every moment of making it as much as I do. I’d love to hear how yours turns out! Feel free to comment below or share any fun variations you tried. Happy baking, my friend!
Leave a Comment