

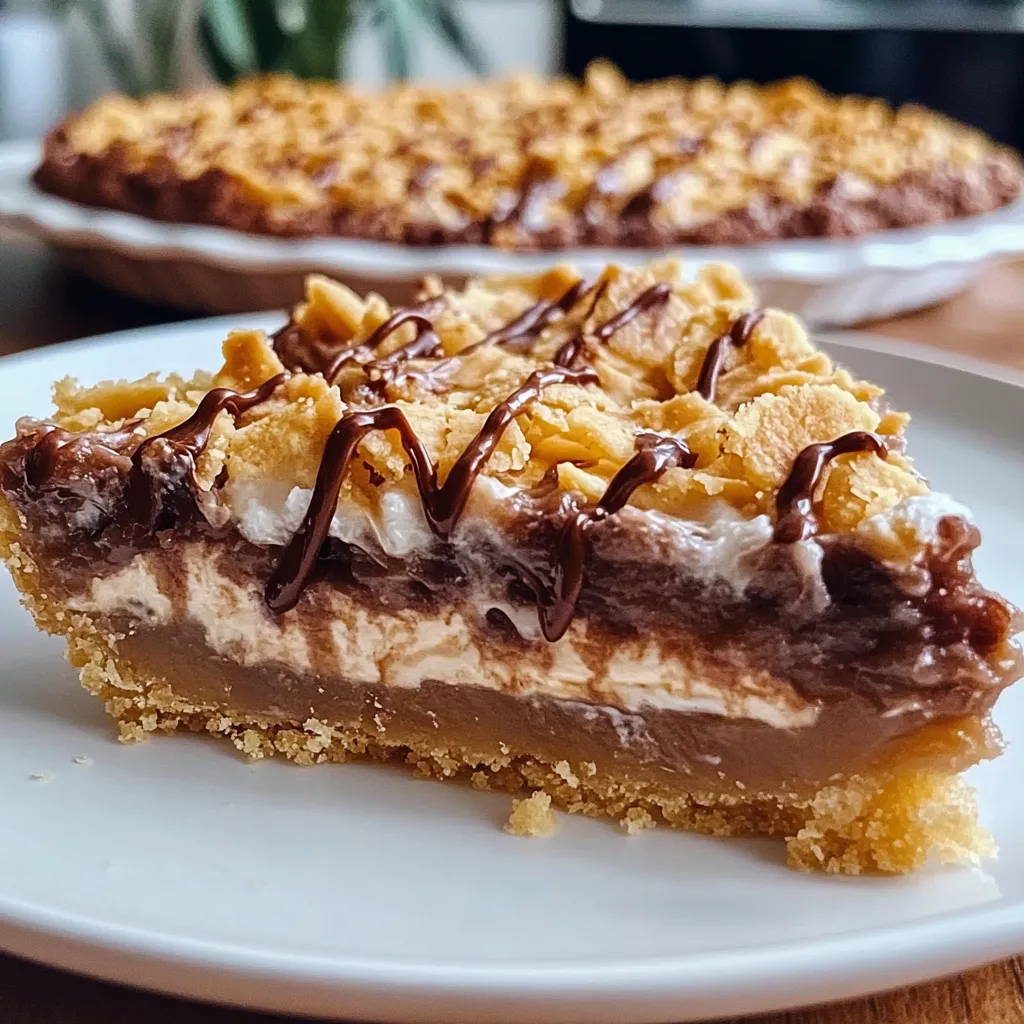
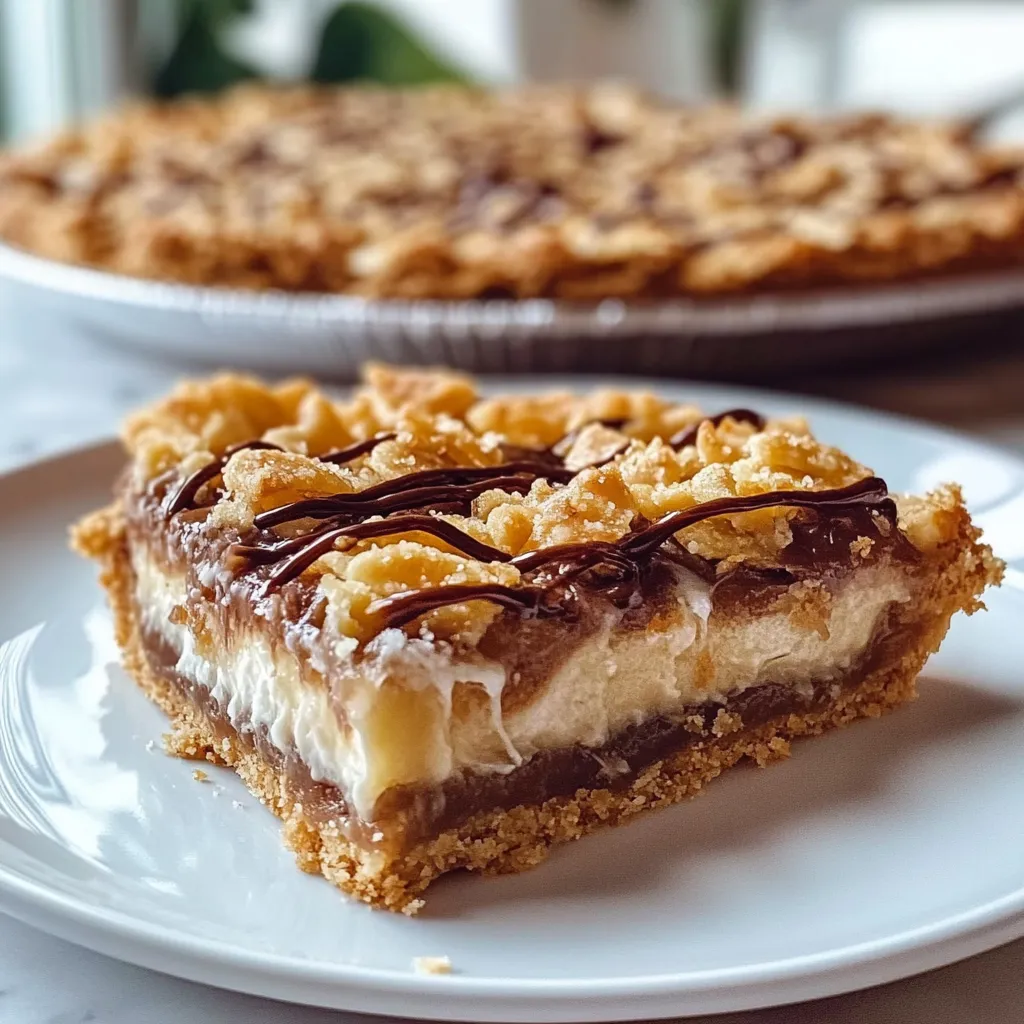
As the leaves turn golden and the air gets that crisp edge that only autumn brings, I find myself reminiscing about the delightful desserts of my childhood. One of my all-time favorites has to be the Samoa cookie, with its luscious layers of chocolate, coconut, and caramel. So, when inspiration struck to create a pie version of this beloved treat, it was as if the universe aligned, and voilà! The Best Samoa Pie Recipe was born in my cozy kitchen. Picture this: a buttery crust cradling a rich, creamy filling topped with toasted coconut and drizzled with chocolate—absolute heaven! Trust me; one slice will make you lose your mind (in the best way possible).
Why You’ll Love This Recipe
- Easy to whip up for weeknight desserts or special occasions.
- Decadent layers of flavor that satisfy every sweet tooth.
- Impressive enough to wow your guests but simple enough for any home baker.
- Great for making ahead and perfect for sharing (if you want!).
Ingredients
Let’s gather our pantry staples and get ready to create something magical!
- For the crust:
- 1 ½ cups graham cracker crumbs (about 10 full sheets)
- ⅓ cup sugar
- ½ cup unsalted butter, melted
- For the filling:
- 1 cup heavy cream
- 1 cup sweetened condensed milk
- ½ cup coconut milk
- 1 teaspoon vanilla extract
- 3 large eggs
- For the topping:
- 2 cups sweetened shredded coconut
- ¼ cup chocolate chips
- ¼ cup caramel sauce (store-bought or homemade)
Note: Make sure to toast your coconut for an extra depth of flavor—trust me, it makes a world of difference!
Step-by-Step Instructions
Time to get our hands a little messy and create this beauty!
- Preheat the oven: Set your oven to 350°F (175°C). We want it nice and toasty for our pie.
- Make the crust: In a bowl, combine the graham cracker crumbs, sugar, and melted butter. Mix until all the crumbs are evenly coated. Press this mixture firmly into the bottom and up the sides of a 9-inch pie pan. Bake for 8-10 minutes, or until it’s golden and fragrant. Set aside to cool.
- Prepare the filling: In a large bowl, whisk together the heavy cream, sweetened condensed milk, coconut milk, vanilla extract, and eggs until smooth. Make sure there are no lumps! This is the creamy layer that will melt in your mouth.
- Pour and bake: Pour the filling into the cooled crust. Pop it into the oven and bake for 25-30 minutes or until the edges are set and the center is just slightly jiggly. It will firm up as it cools.
- Toast the coconut: While the pie is baking, spread the shredded coconut on a baking sheet and toast it in the oven for 5-7 minutes until golden brown. Keep an eye on it; it can go from perfect to burnt in a flash!
- Cool and top: Once the pie is out of the oven, let it cool for at least 30 minutes. When it’s cool, sprinkle the toasted coconut over the top, drizzle with caramel sauce and melted chocolate chips.
- Chill and enjoy: For the best flavor, let your pie chill in the refrigerator for at least an hour before slicing. This allows the flavors to meld together perfectly.
Tip: Don’t rush the cooling step! The pie tastes even better after chilling, so it’s worth the wait.
Pro Tips & Variations
Feeling adventurous? Here are a few ideas to add your personal touch to the Best Samoa Pie Recipe:
- Spice it up: A pinch of nutmeg or a sprinkle of cinnamon in the filling can add a warm, aromatic touch.
- Dairy-Free Option: Substitute the heavy cream and coconut milk with full-fat coconut cream for a delightful dairy-free version.
- Add Crunch: Throw in some chopped pecans or walnuts before pouring in the filling for a delightful crunch!
- Chocolate Lovers Unite: Drizzle extra chocolate sauce or even melted chocolate on top for an indulgent finish!
Remember, the kitchen is your playground, so feel free to get creative!
Serving Suggestions
Now that your Samoa pie is ready to shine, let’s talk about how to serve it! Think cozy vibes—this pie pairs beautifully with a steaming cup of coffee or chai tea. Imagine settling in with a slice while watching the leaves fall outside; it’s pure bliss! You could also serve it alongside a fresh, crisp salad for a contrast of flavors. If you want to take it up a notch, a scoop of vanilla ice cream or a dollop of whipped cream makes for a perfect match!

Storage Tips
Got leftovers? (I mean, who are we kidding, it’s hard to resist this pie!) Here’s how you can store it:
- Refrigeration: Keep your pie covered in the refrigerator, where it’ll stay good for up to 4 days. The flavors will continue to develop, and it’ll be ready to impress whenever you want a slice!
- Freezing: You can freeze it for up to a month. Just make sure it’s well-wrapped in plastic wrap and aluminum foil to prevent freezer burn. When you’re ready to enjoy it again, let it thaw in the fridge overnight.
- Reheating: If you prefer it slightly warm, pop a slice in the microwave for about 10 seconds. Be careful not to overheat, as it can melt the chocolate!
FAQs
Can I use a store-bought pie crust?
Absolutely! A store-bought crust will save you time and still taste delicious. Just make sure it’s fully baked before adding the filling if it’s already pre-cooked. If you want to keep that homemade feel without the fuss, go for a graham cracker or cookie crust—it’s your pie after all!
Is there a way to make this pie gluten-free?
Definitely! Use gluten-free graham crackers or even crushed gluten-free cookies for the crust. Just check the labels to ensure your other ingredients are also gluten-free, and you’ll be good to go!
Can I make this pie ahead of time?
Yes! This pie actually tastes better when made ahead because it allows the flavors to meld together. Just make sure to store it in the fridge, and you can easily prepare it a day or two in advance.
What’s the best way to cut the pie?
A hot knife works wonders! Dip a knife into hot water for a few seconds and then wipe it dry before cutting your slice. This helps avoid any messy edges and gives you a clean cut to that gorgeous filling!
Conclusion
And there you have it—the Best Samoa Pie Recipe that’ll warm your heart and tantalize your taste buds! I can just imagine you in your kitchen now, letting the sweet, nutty aroma fill your home while you whip this up. I’d absolutely love to hear how it turns out for you! Please drop a comment below and share your own baking adventures or give me a shout if you have any questions. Happy baking, friends!

Leave a Comment